Your "7s" and "8s" are the most dangerous segment in your CRM. That’s because they’re the ones who leave without making a scene. Yes, you might think they’re a risky crowd, but there’s also opportunity here.
As they’re not technically Detractors, but it can be relatively easy to turn this silent middle into a source of conversion lift, product insights, and recurring revenue. Here are six ways you can stop guessing what your NPS Passives need to turn them into genuinely happy users.
Why passive customers are just one step away from leaving
It’s easy to think of passive customers as "fine" since they aren’t complaining, but psychology suggests this neutrality is actually a state of fragile satisfaction. As Richard L. Oliver’s research shows, being satisfied is just an early step toward loyalty. It lacks the emotional or personal commitment needed for a customer to truly stick around.
Without that deeper spark, these individuals remain in a holding pattern. They experience a lukewarm connection that doesn't offer much protection against a competitor's flashy new offer. Since there isn't a deep emotional buy-in yet, these folks usually stay because of a low price or a convenient location, not because they actually love the brand.
There are five main drivers of passive NPS behavior
Here’s what we’ve noticed over the years at Survicate:
- Moderate satisfaction. Customers feel the product or service is “good enough,” but not “good enough” to strongly recommend it.
- Weak emotional connection. Clients may feel indifferent about a brand or service. Satisfaction alone doesn’t create loyalty if customers don’t feel attached to the brand.
- Low differentiation. When competing products seem similar, customers choose based on convenience or price rather than preference (assuming they don’t have an emotional bond with a brand).
- Low switching barriers. If it’s easy to try alternatives, customers have little motivation to become loyal.
- Small but repeated frictions. Minor usability or service issues may not trigger complaints but they can gradually reduce enthusiasm.
Actions product teams can take to engage Passives
#1. Find friction Passives have accepted (and fix it)
If you engage NPS Passives directly within Survicate, you can extract the lucid, specific insights Passives have been "quietly absorbing". You’re able to do that before friction turns into a loud, expensive face-plant.
Since this is a proactive measure, your customers will surely notice. You can prove to them that their score is a signal for having a real discussion, rather than a metric sitting in a dashboard. And that conversation can turn silent observers into vocal Promoters.
Below, we’re going to show you how to address Passives from a recent NPS survey.
To demonstrate how it works in Survicate, we’re going to show you how to set up a survey from scratch so you can see the recommended flow.
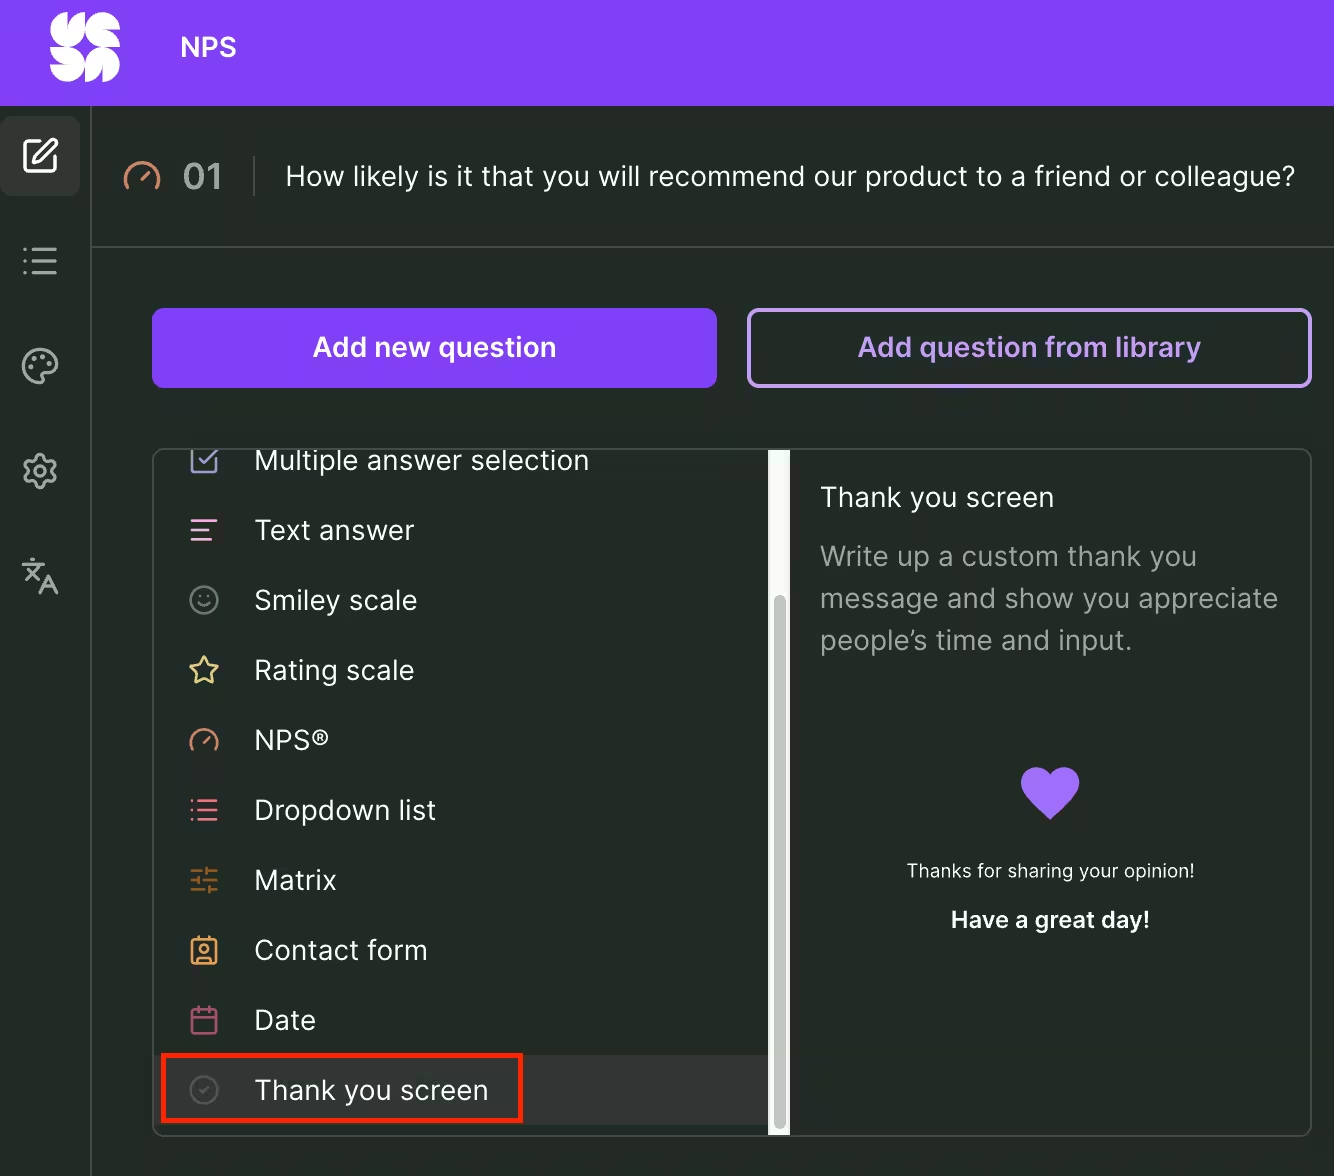
How to do it in Survicate, step by step:
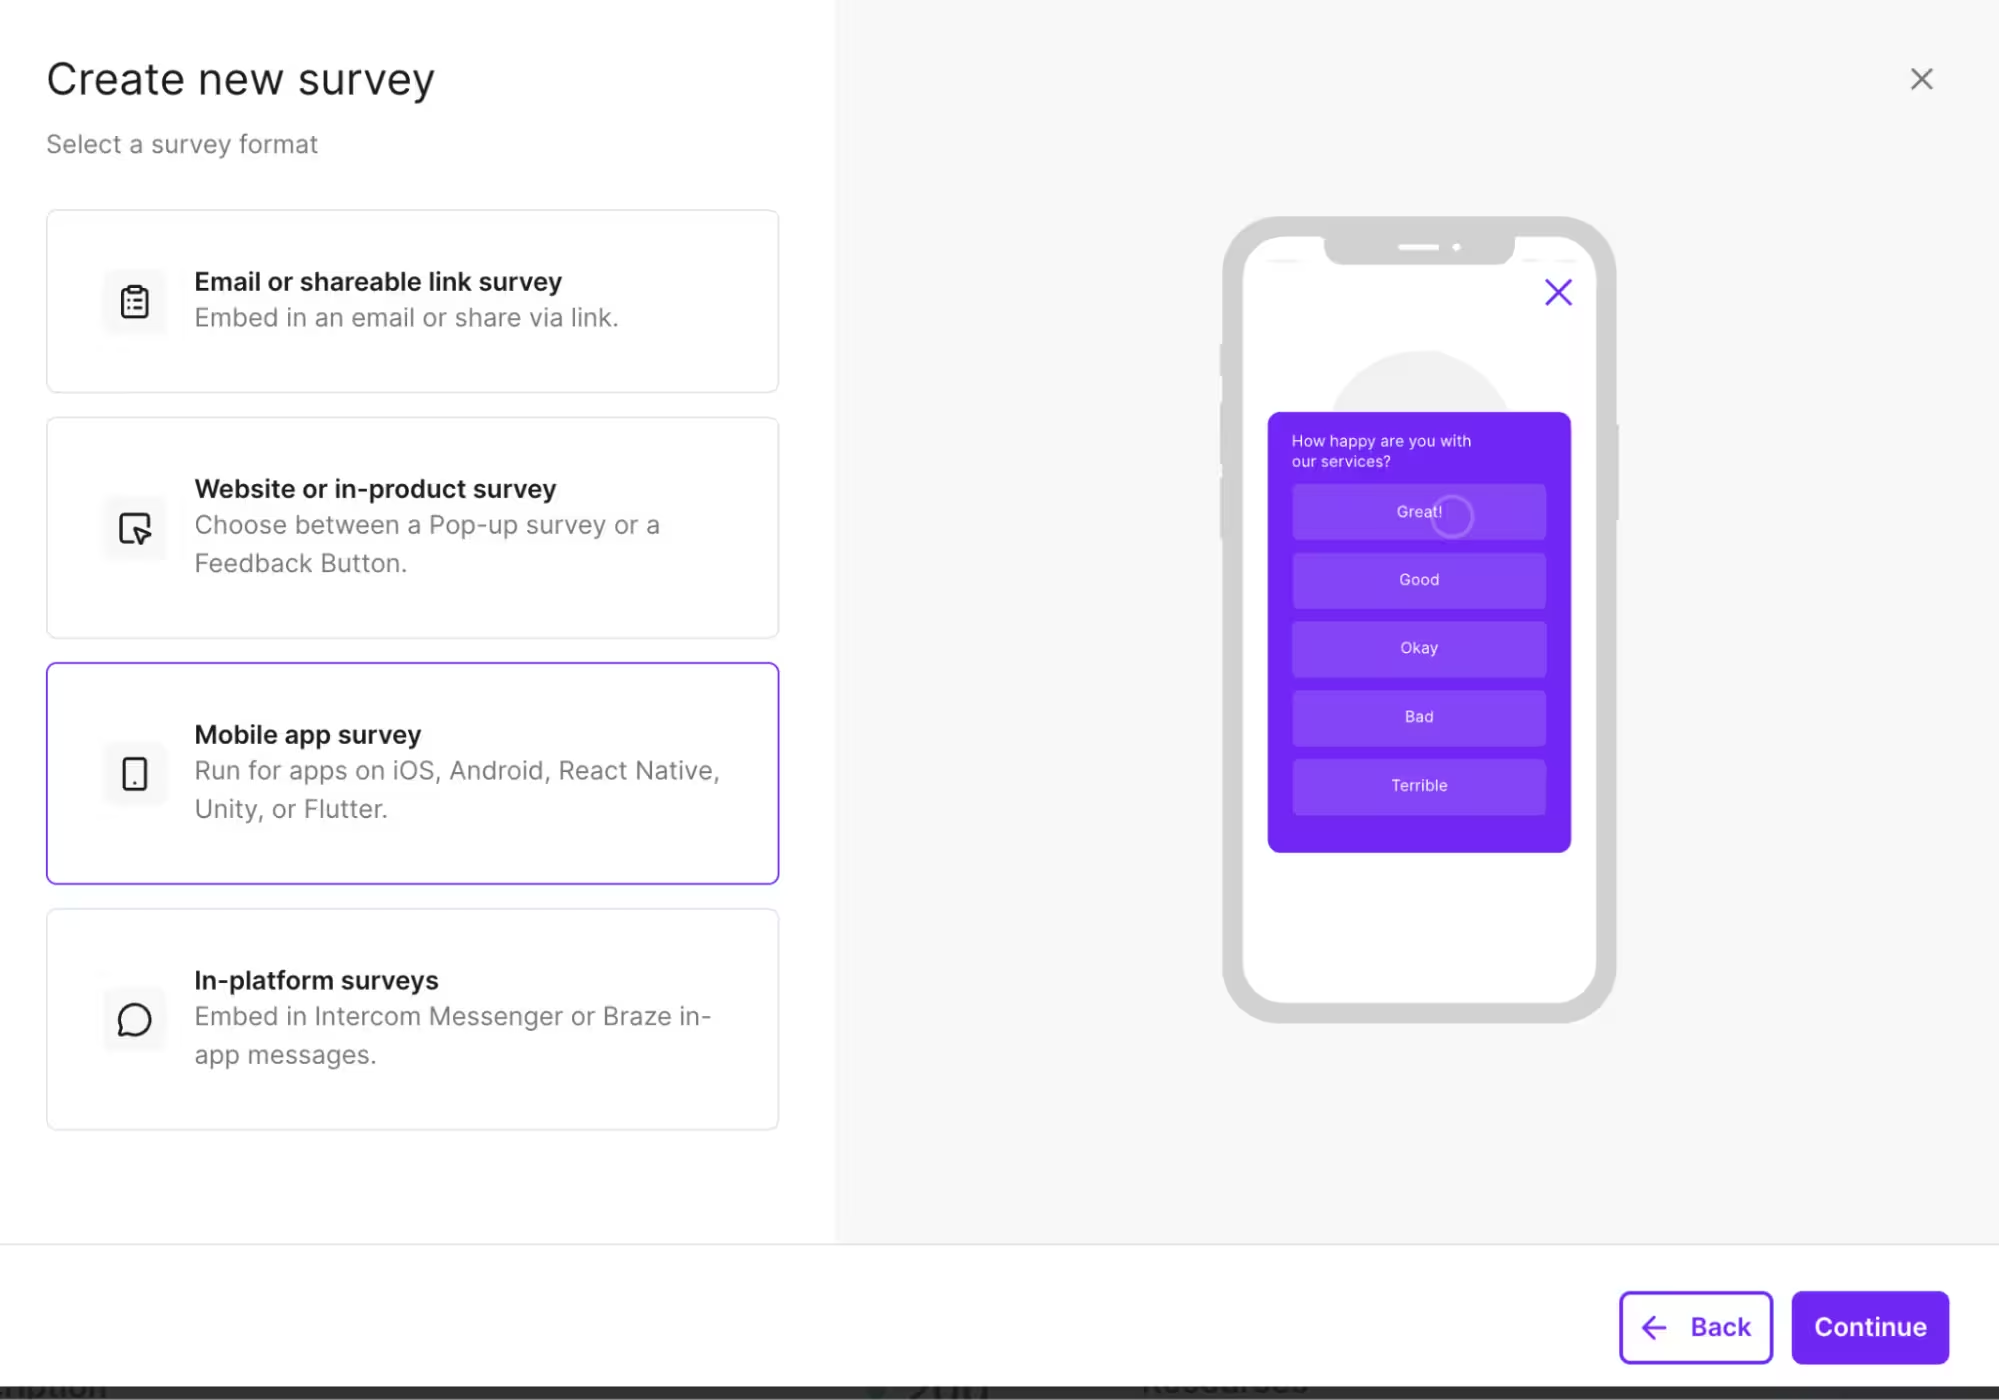
Step 1: Inside the panel, head to Surveys, then click Create Survey. Pick either a mobile app or in-product survey.
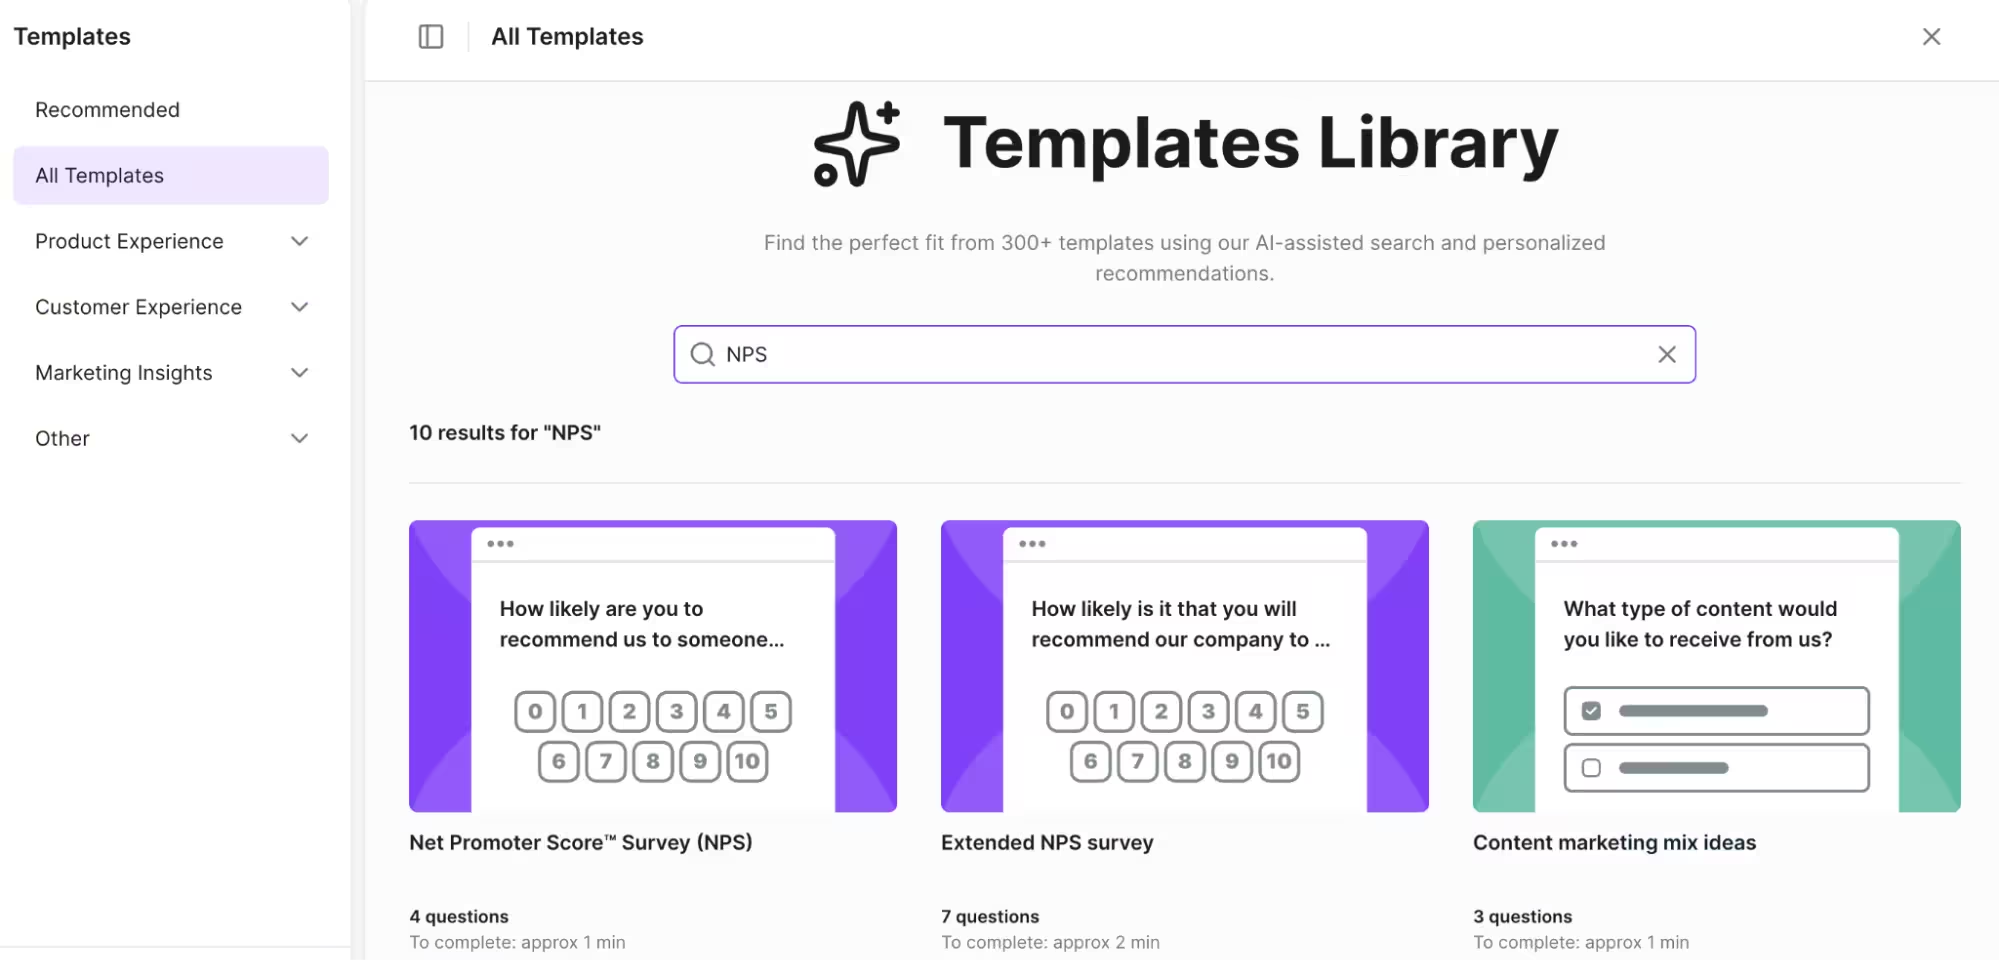
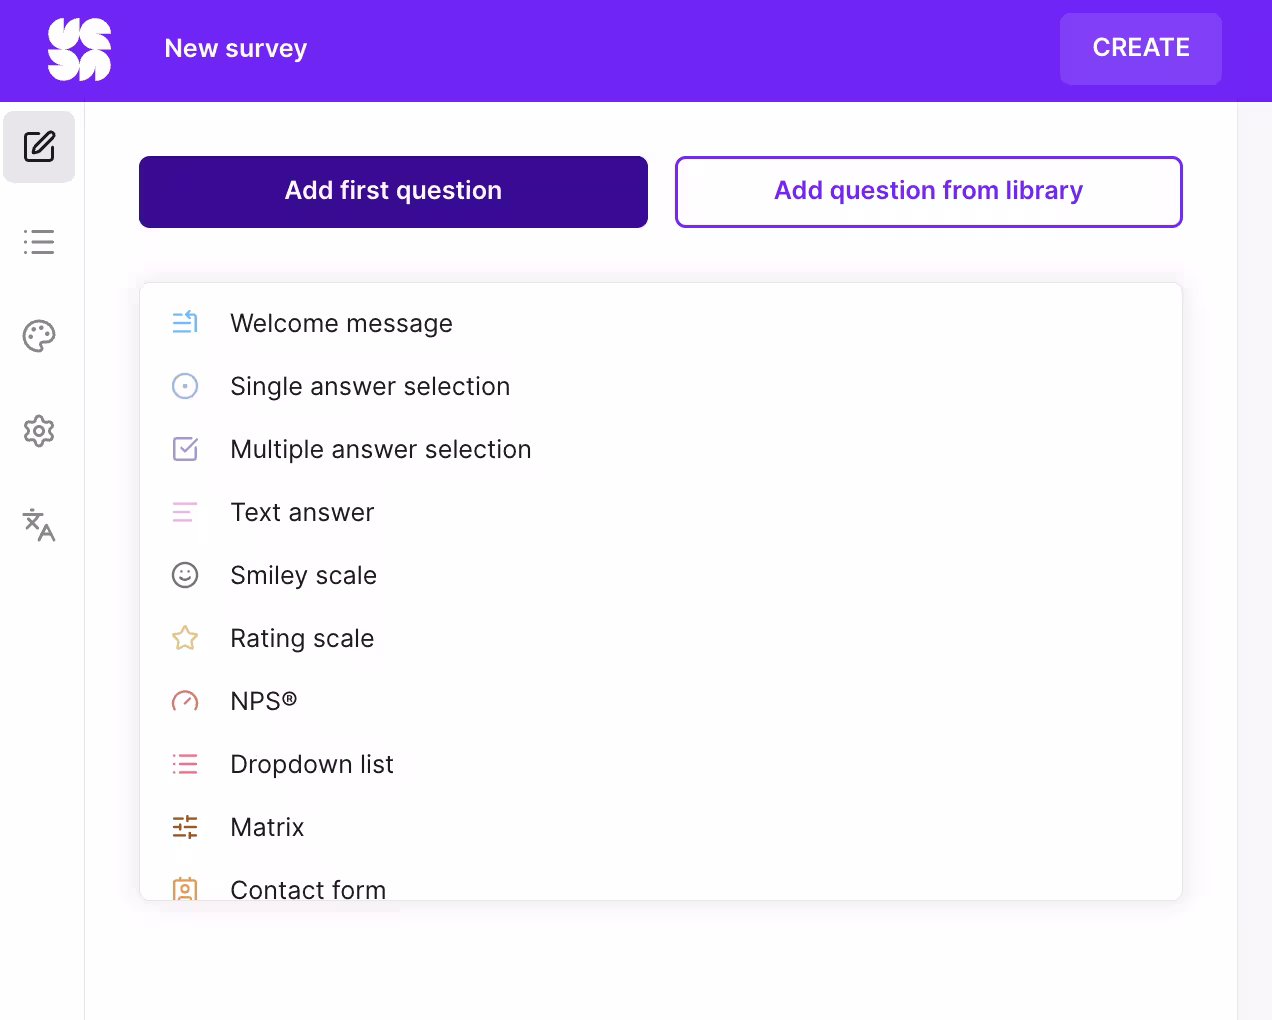
Step 2: You don’t have to create an NPS survey from scratch – use one from the Templates Library, as on the screen below.
Step 3: The first question you’ll see will be the NPS rating question.
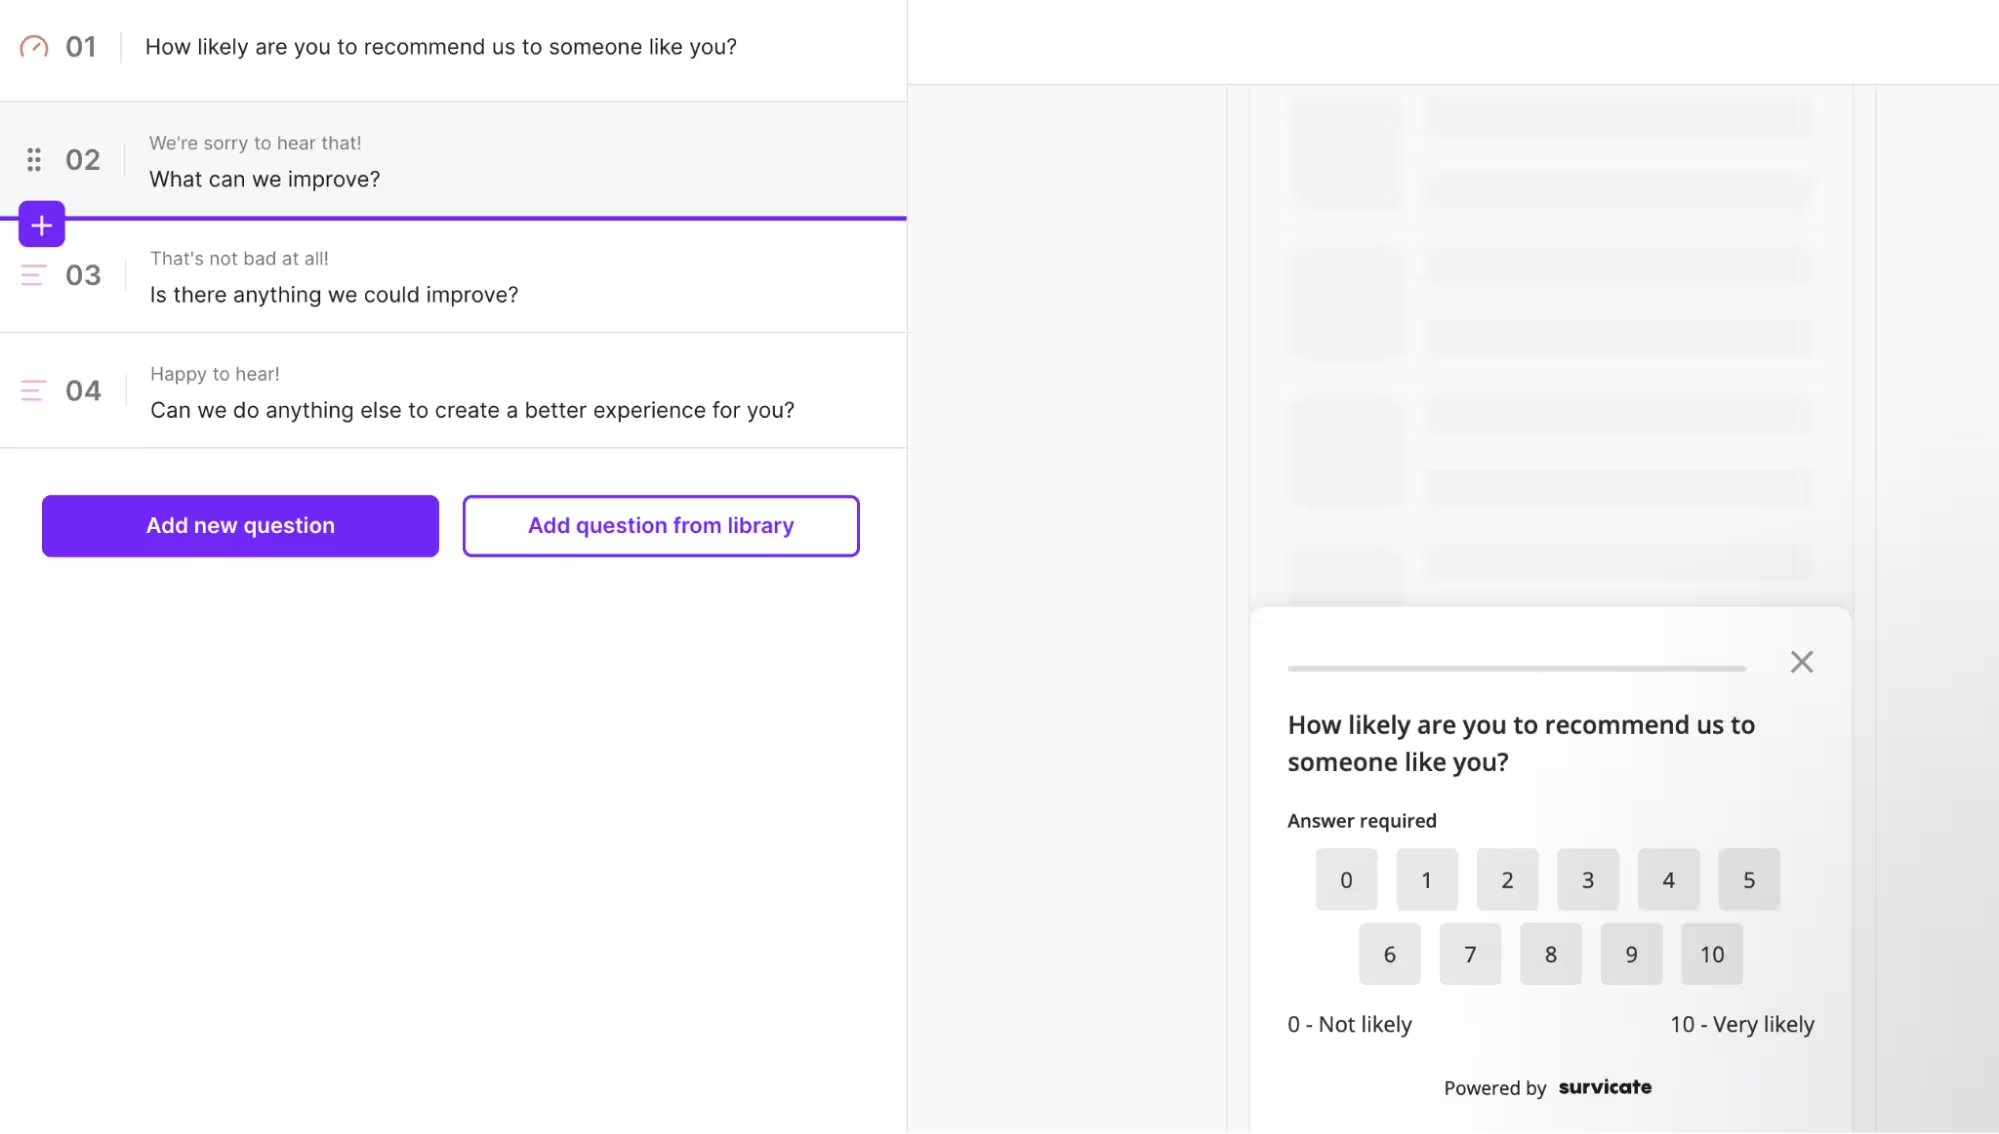
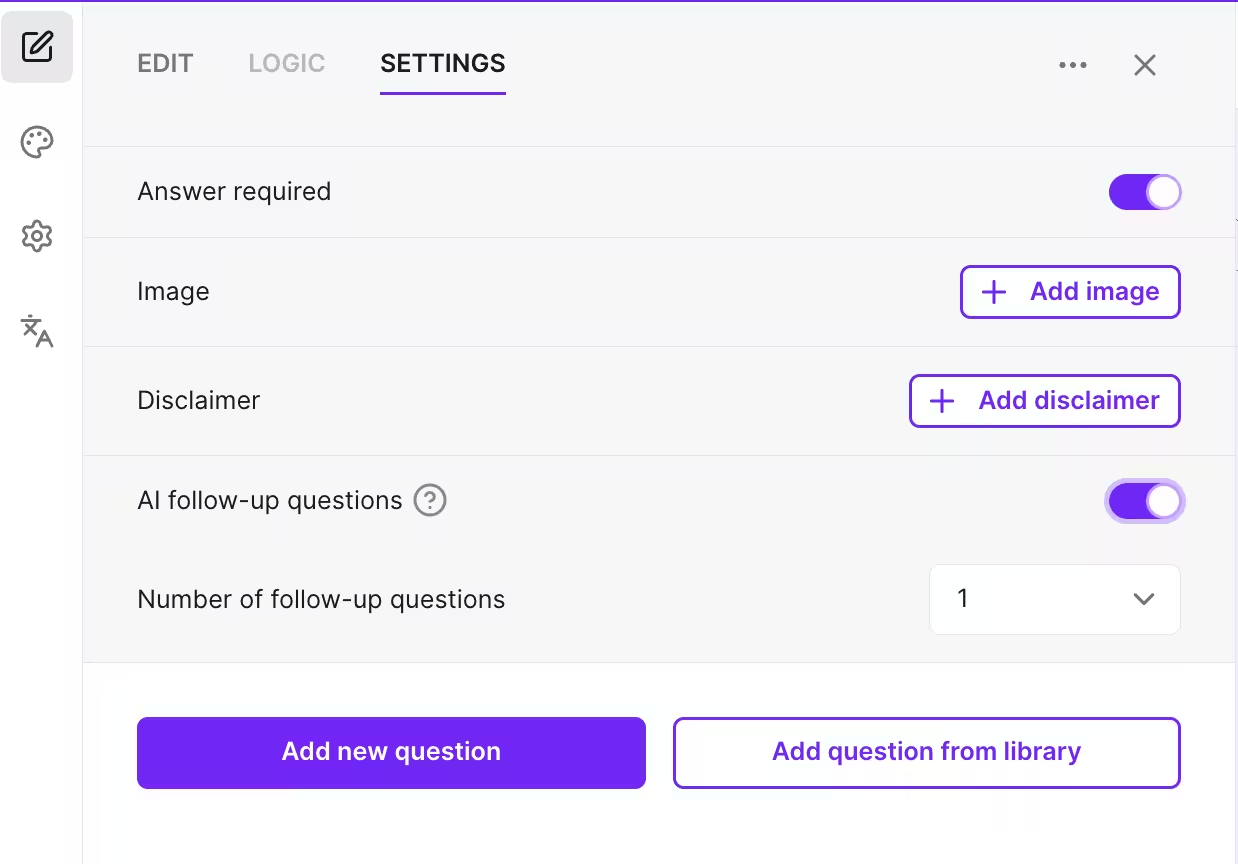
Click Add new question and create an open-ended follow-up specifically for those passive scores. A simple text question works best here – something like: "What is one thing that creates friction or slows things down when you’re using [product]?"

Not up for writing a question yourself? You can use the AI follow-up question module to select a question that fits your passive users’ needs.
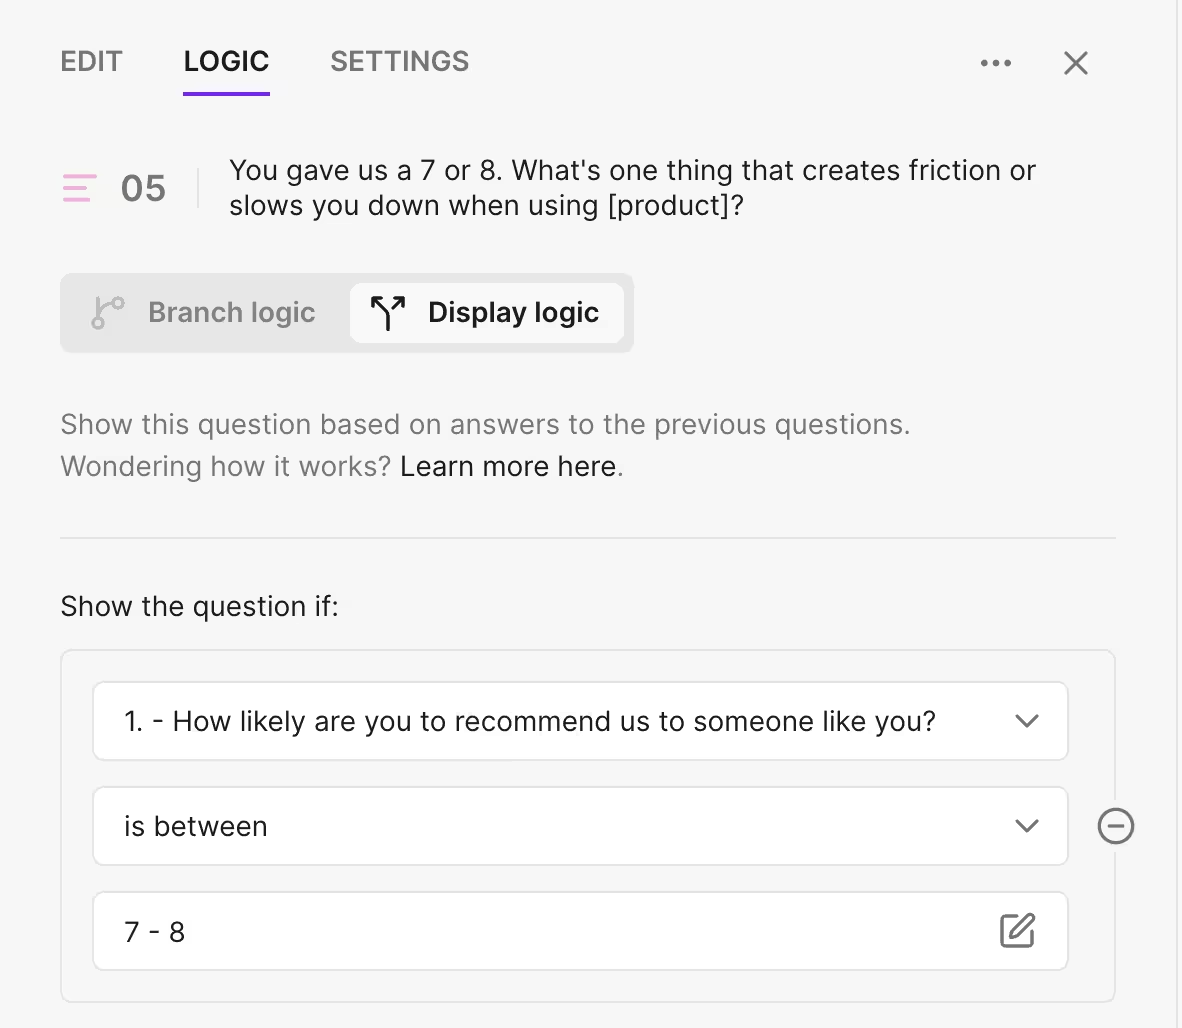
Step 4: Click on the Logic tab on the follow up question and select “Display logic”. Choose to show the question only if the user gave a score between 7 and 8. Everyone else will automatically skip to the end of the NPS survey. Then click Next.
Step 5: To gather the most relevant feedback, it’s best to focus on users who have actually spent some time using your product. Start by creating an audience and selecting the frequency attribute under Visit properties. Set the frequency to more than 3 times to ensure these users are regular visitors. Once that audience is saved, head to the left-hand bar and select the clock icon to set the timing.
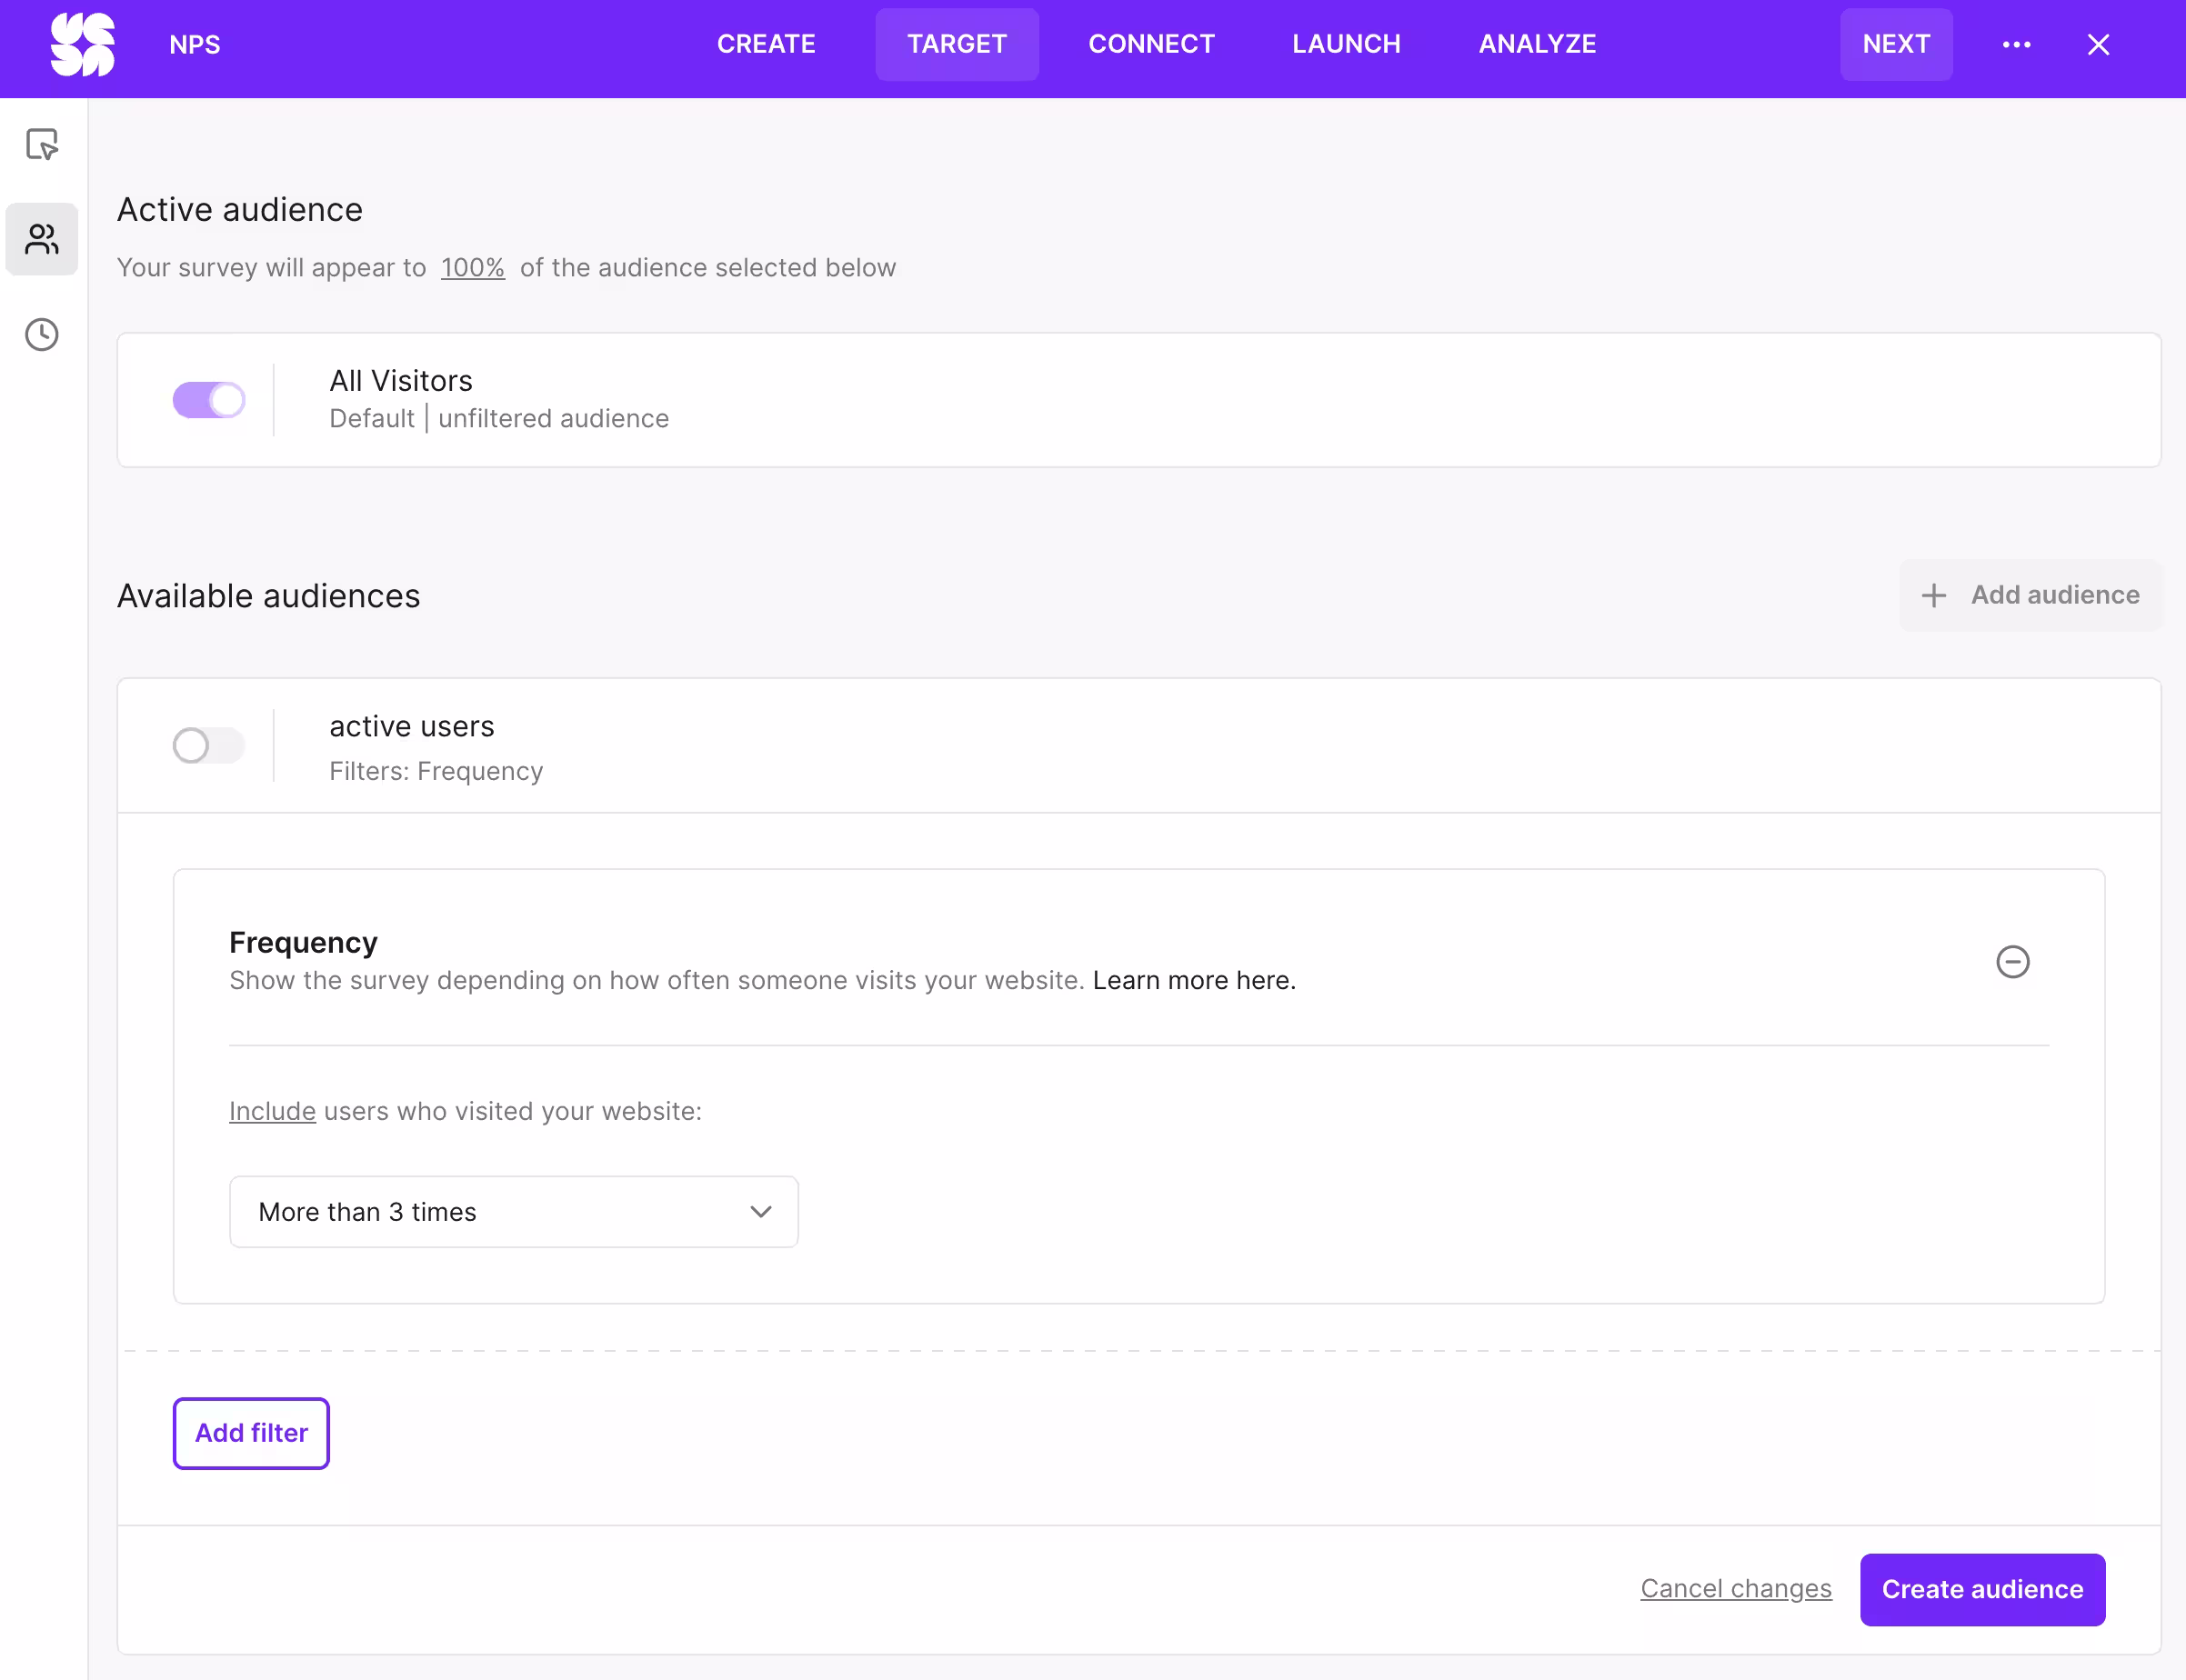
Keep in mind that you can send custom attributes to Survicate to narrow the focus even further, like targeting only Paid customers.
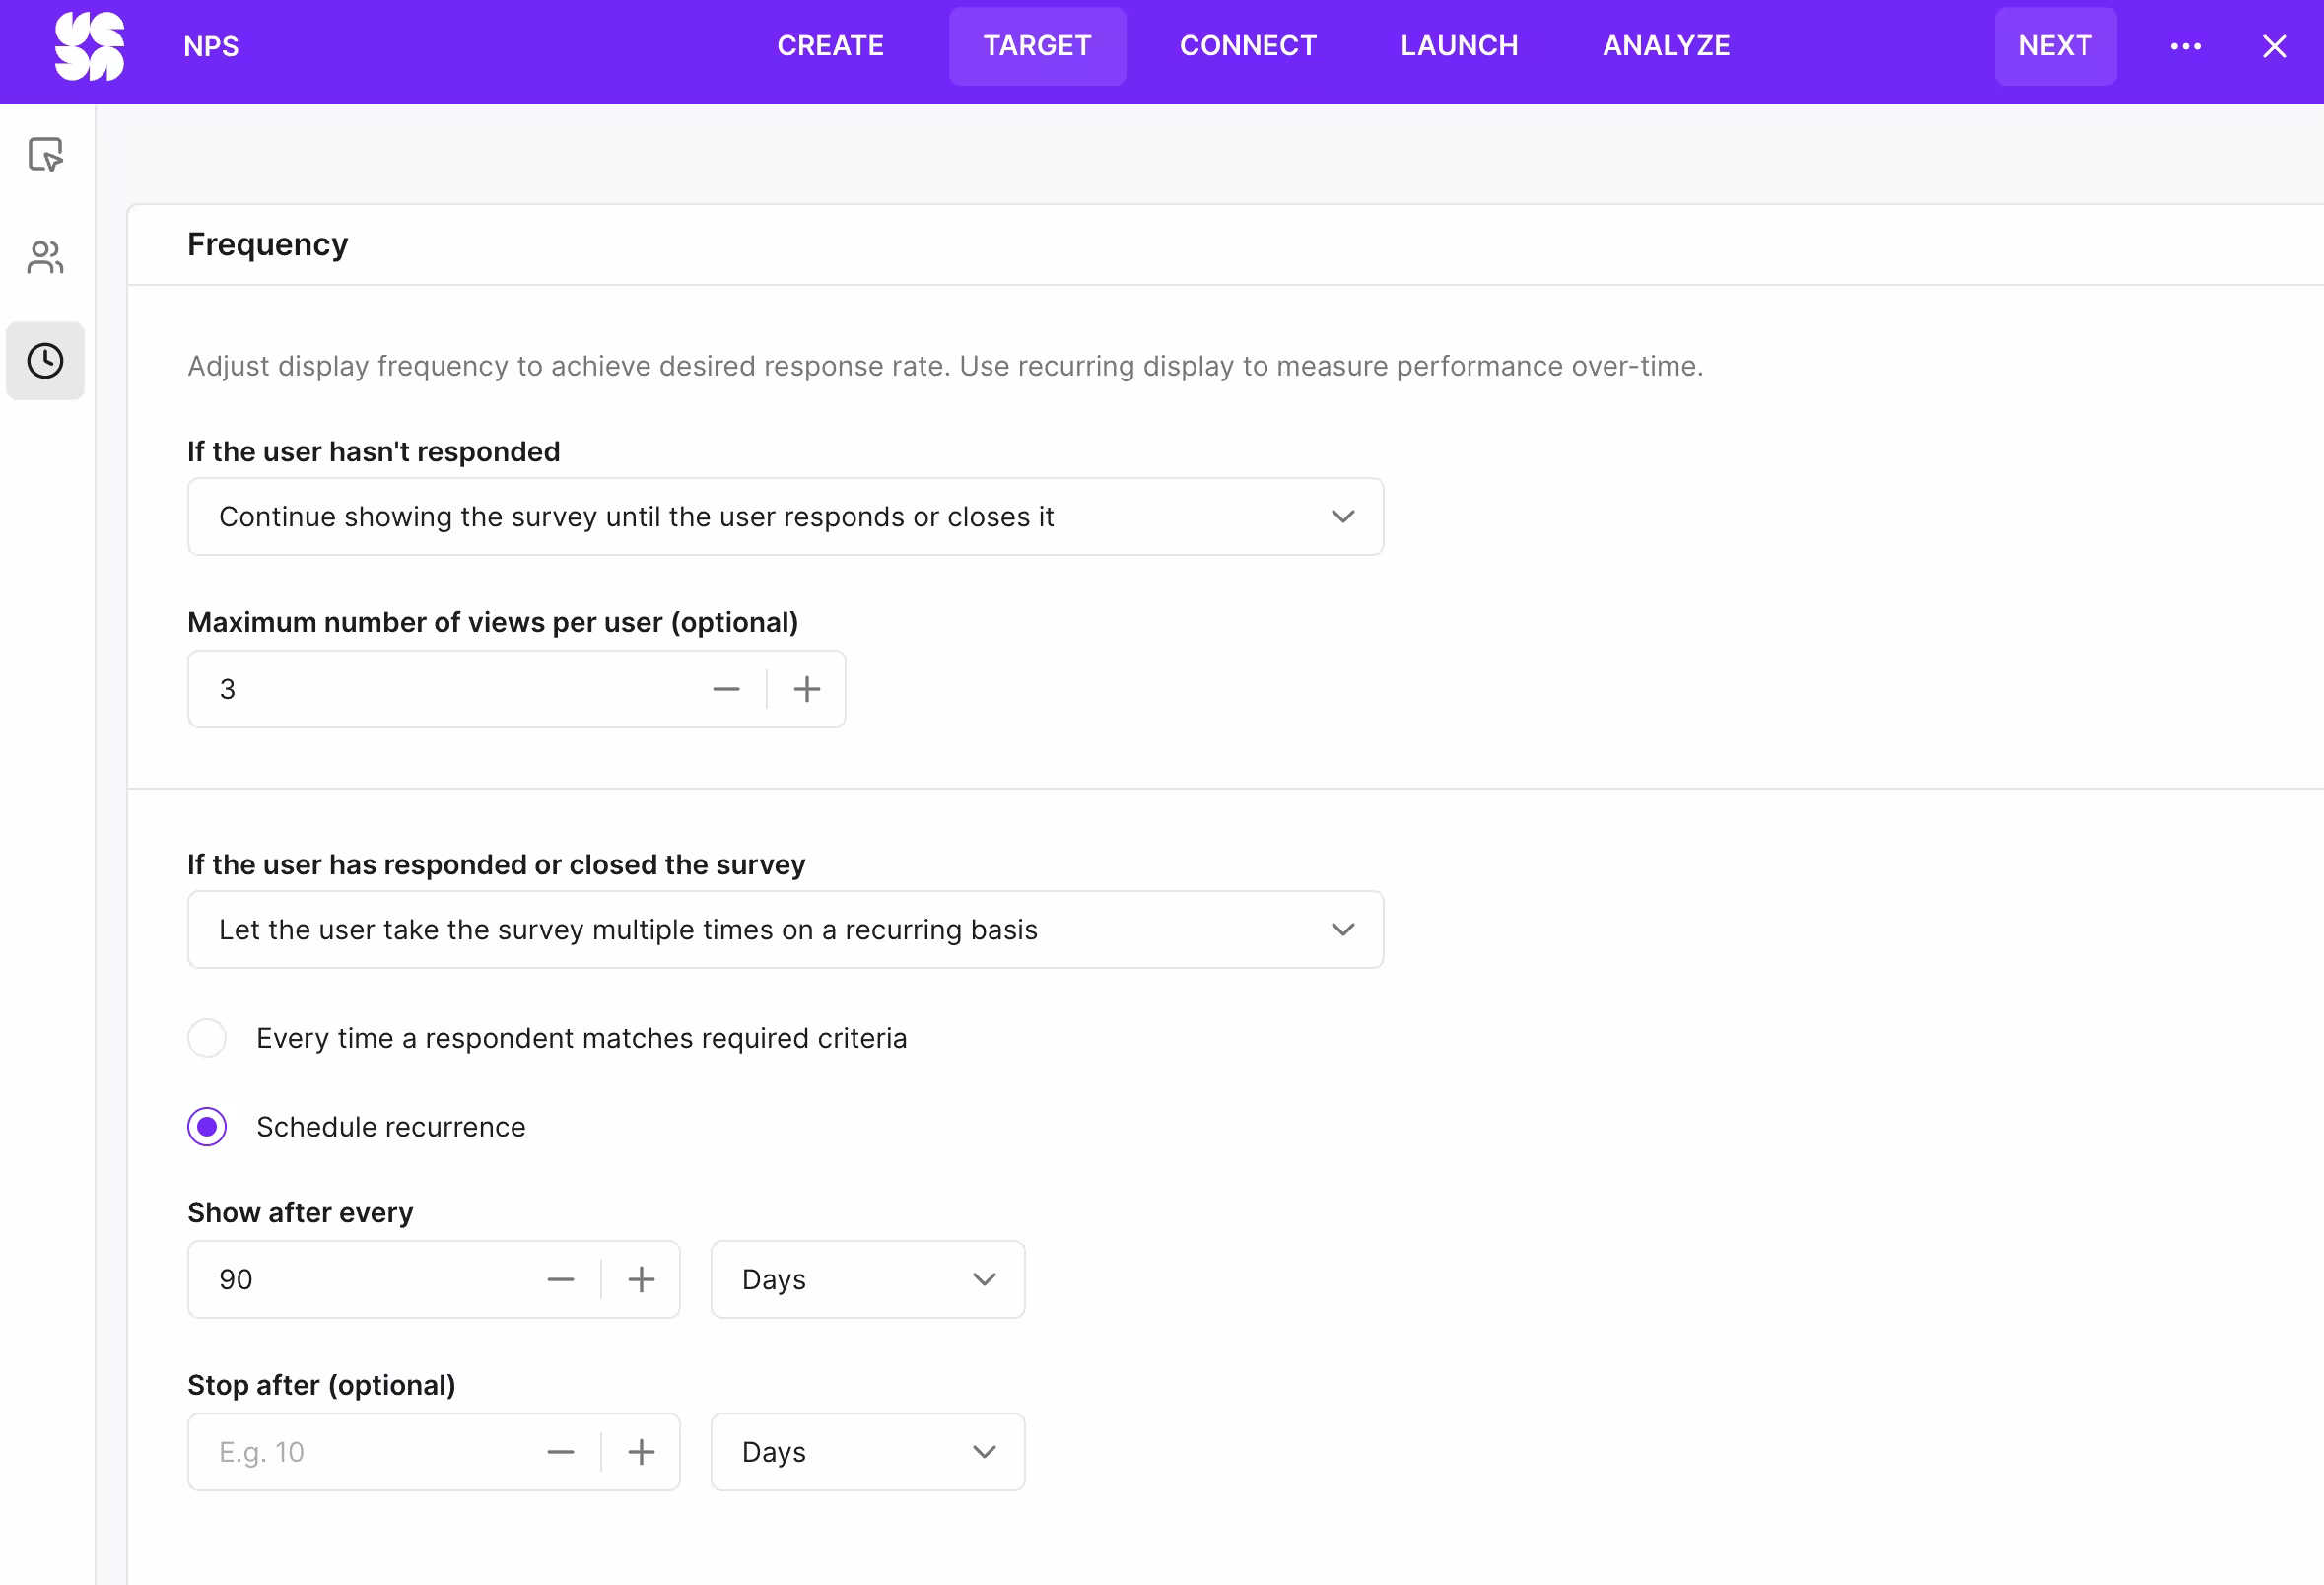
Step 6: Under "If the user has responded or closed the survey," select "Let the user take the survey multiple times..." and then "schedule recurrence." Setting the NPS to show every 90 days is a great way to avoid survey fatigue while still keeping the data fresh and relevant.
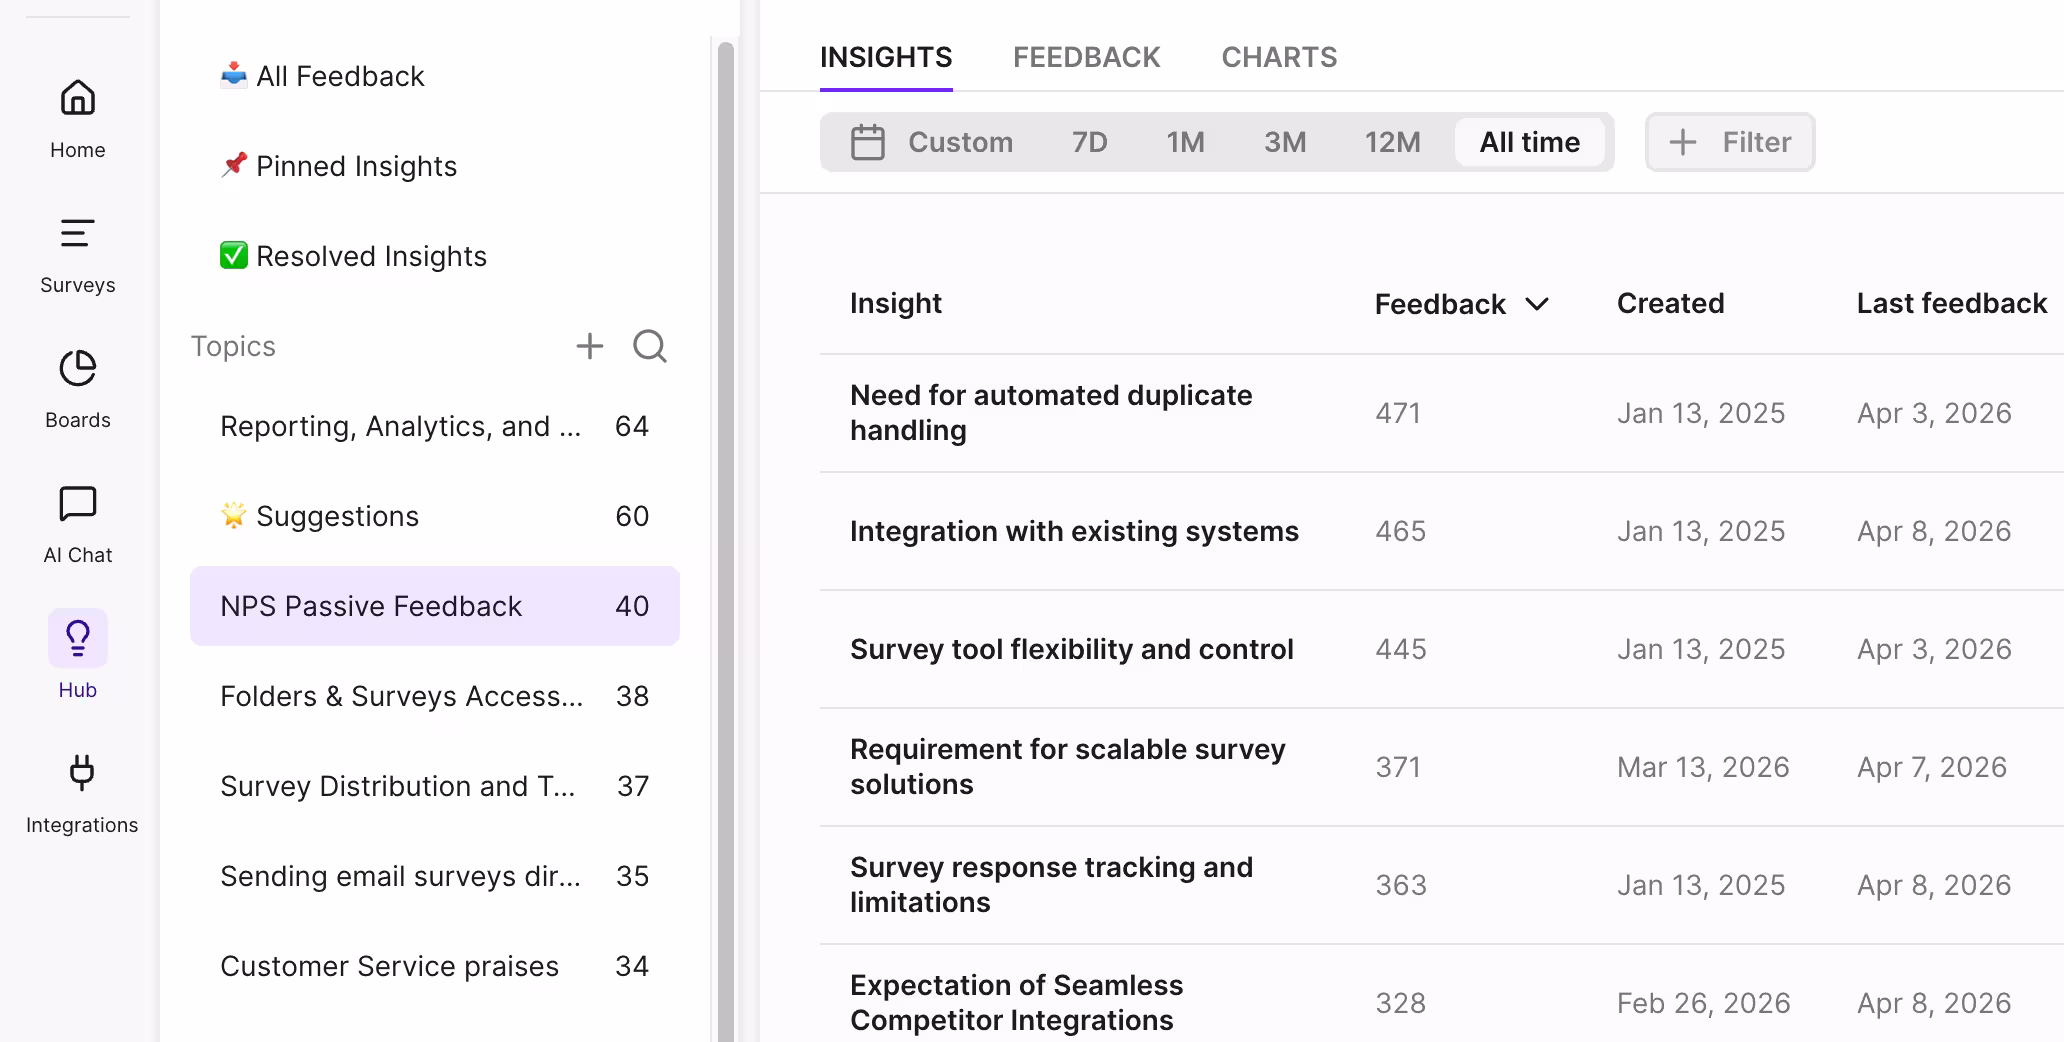
Step 7: As responses start rolling in, you can track the Insights generated at survey level. To see the bigger picture and triangulate the data, create a dedicated topic in Research Hub to auto-cluster those open-ended answers into clear themes. This makes it much easier to spot friction that pops up repeatedly, helping to separate systemic issues from one-off complaints.
#2: Catch Passives in the moment, before they drift
Instead of waiting for a late NPS survey to guess why someone is drifting away, a quick one-question micro-survey triggered the moment a user skips a key "aha" feature captures fresh, honest feedback.
This real-time approach catches specific friction – like a confusing button or a feature that feels irrelevant – while the experience is still top of mind.
How to do it in Survicate, step by step:
Step 1: Click create a New survey, select Create your own survey from scratch, or select In-product survey.
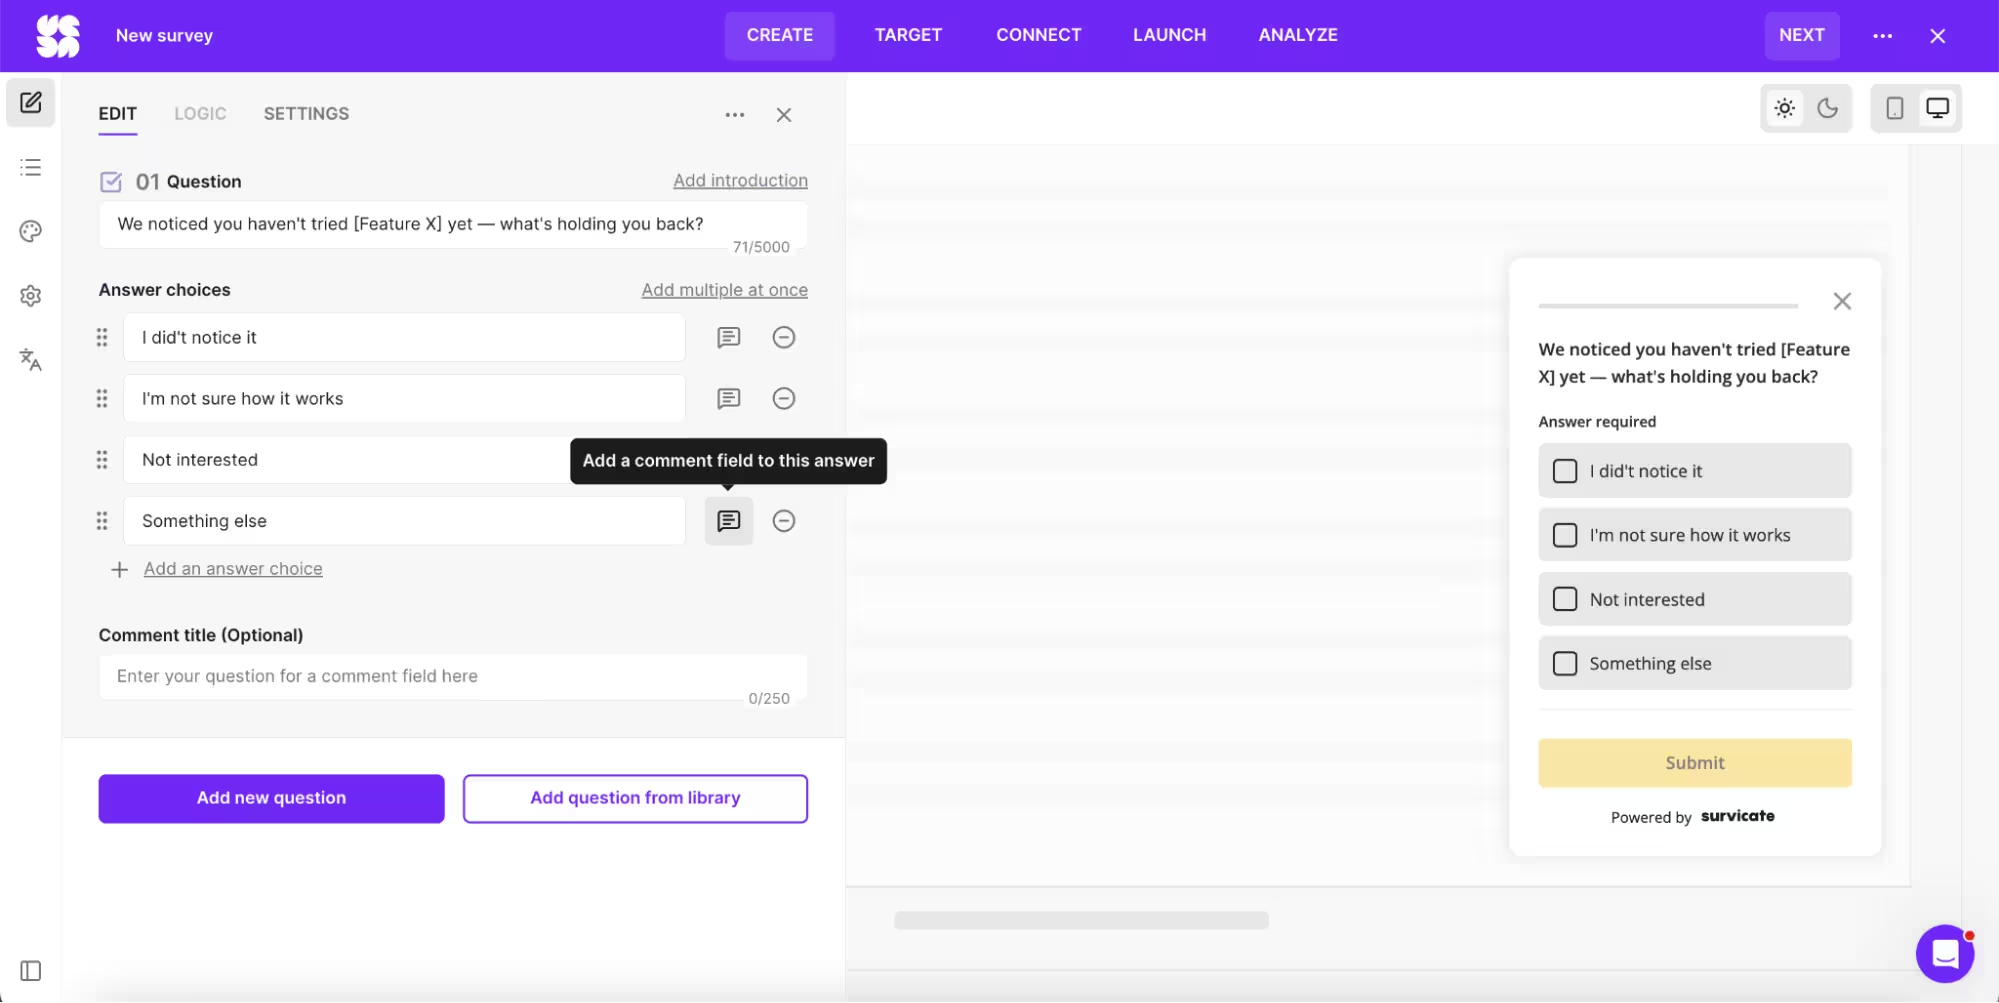
Step 2: Click Add first question, and select Multiple answer selection.
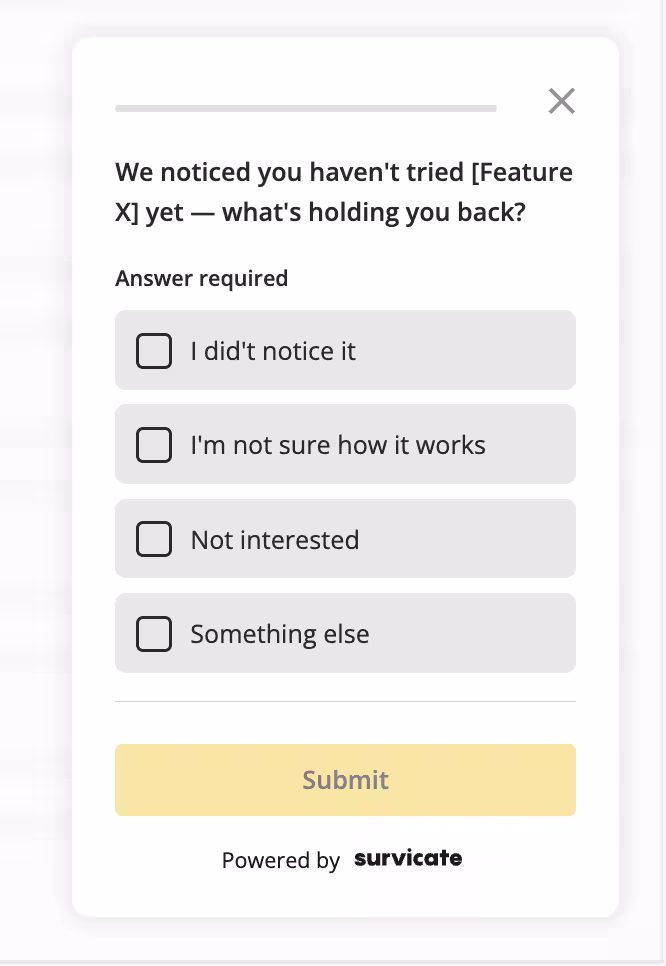
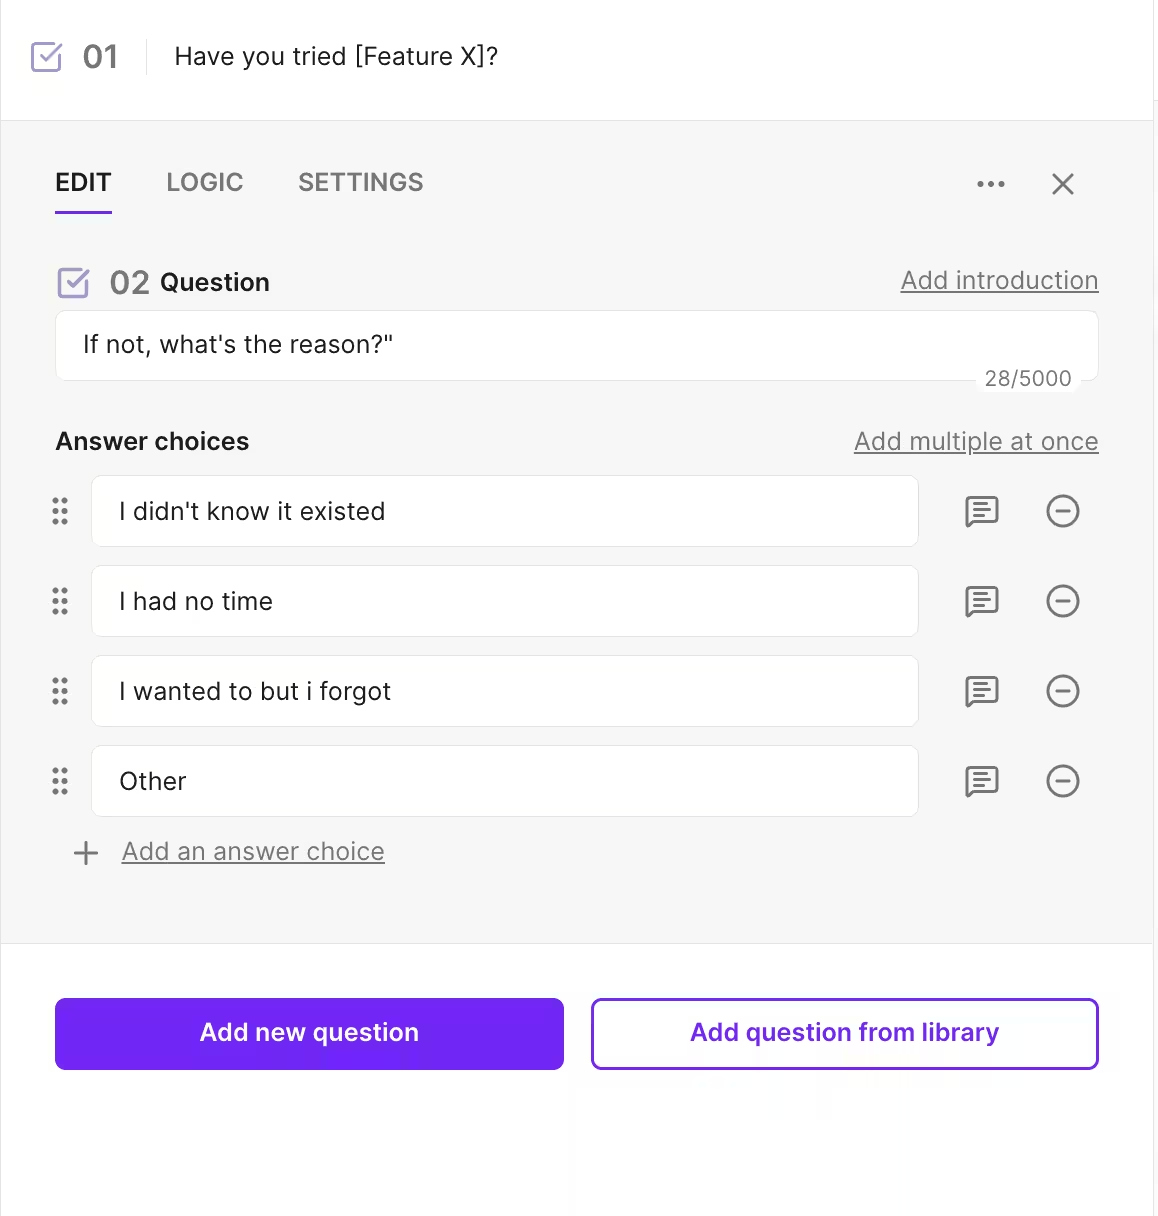
Step 3: A single, targeted question works best here: "We noticed [Feature X] hasn't been tried yet – what’s holding things back?" Including multiple-choice options like "I didn't notice it," "I'm not sure how it works," "It doesn't seem relevant," or "I meant to but forgot" makes it effortless for someone to respond. Adding an open-ended "Other" option is also a great way to catch any unique friction that hasn't been considered.
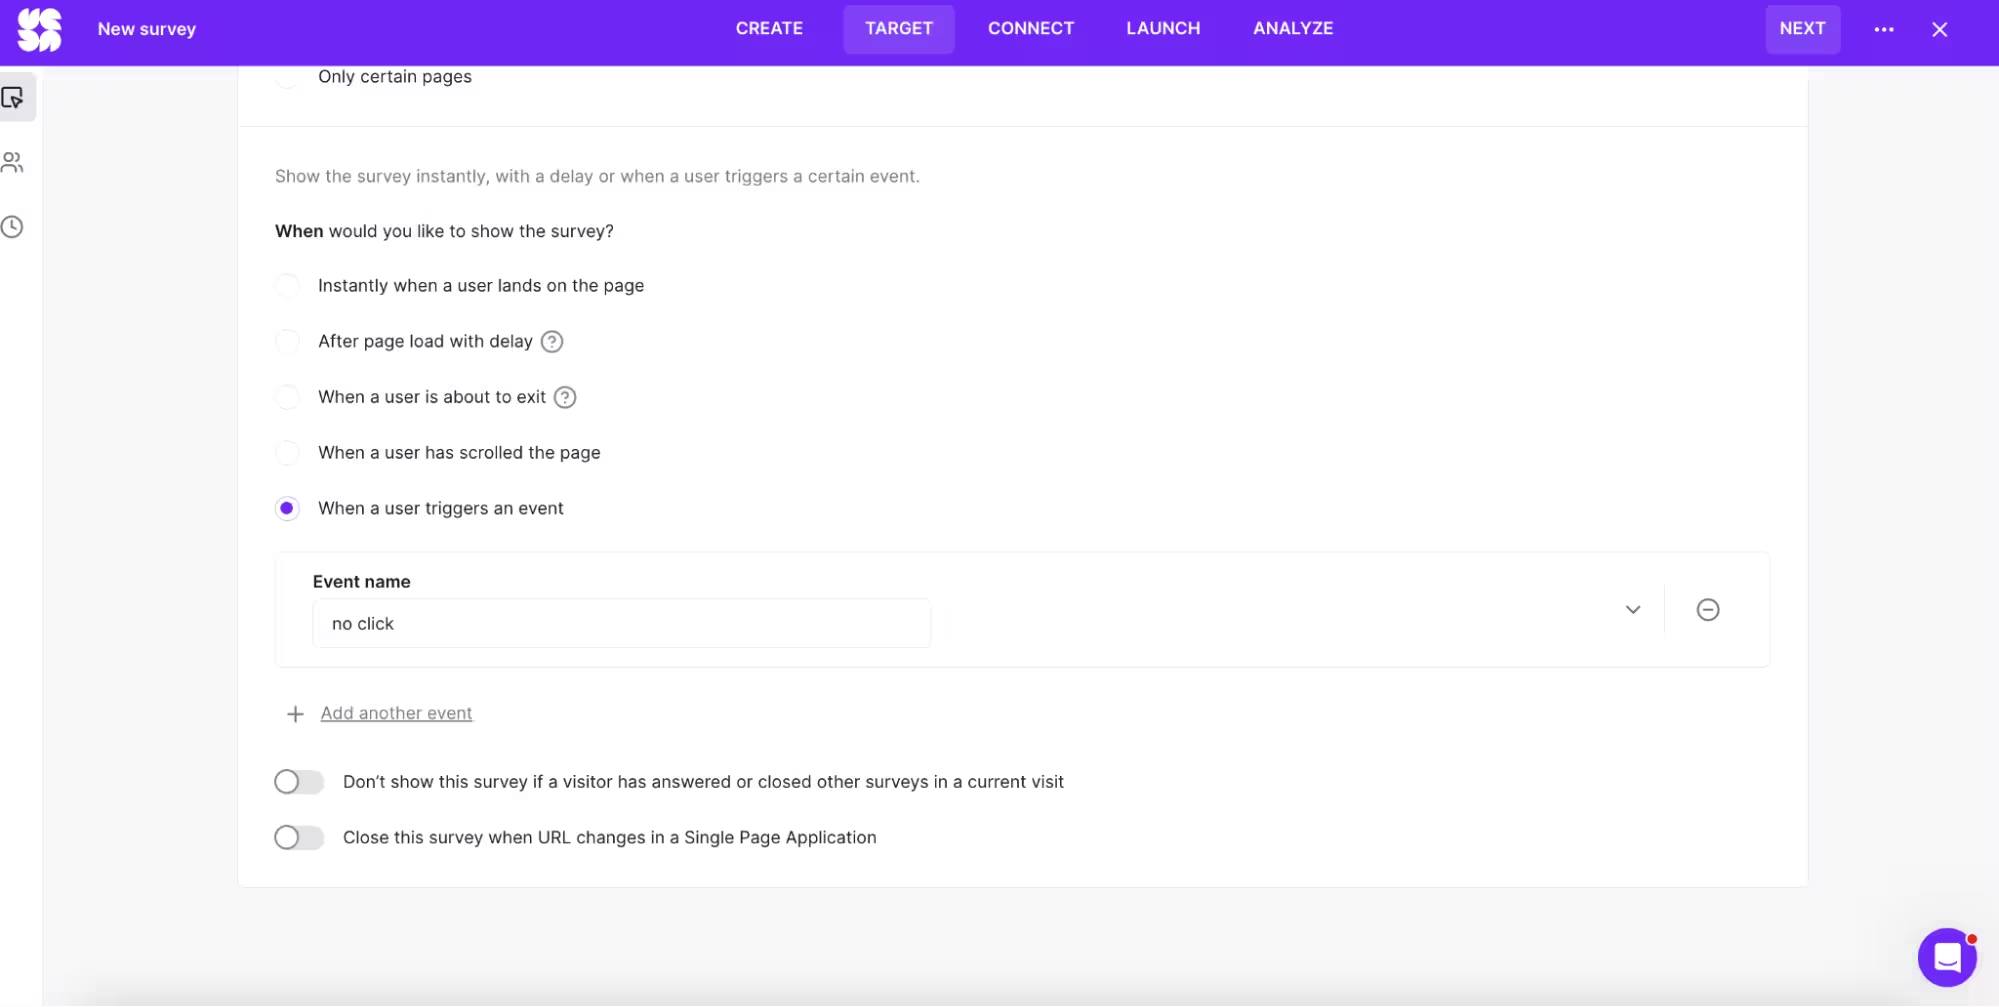
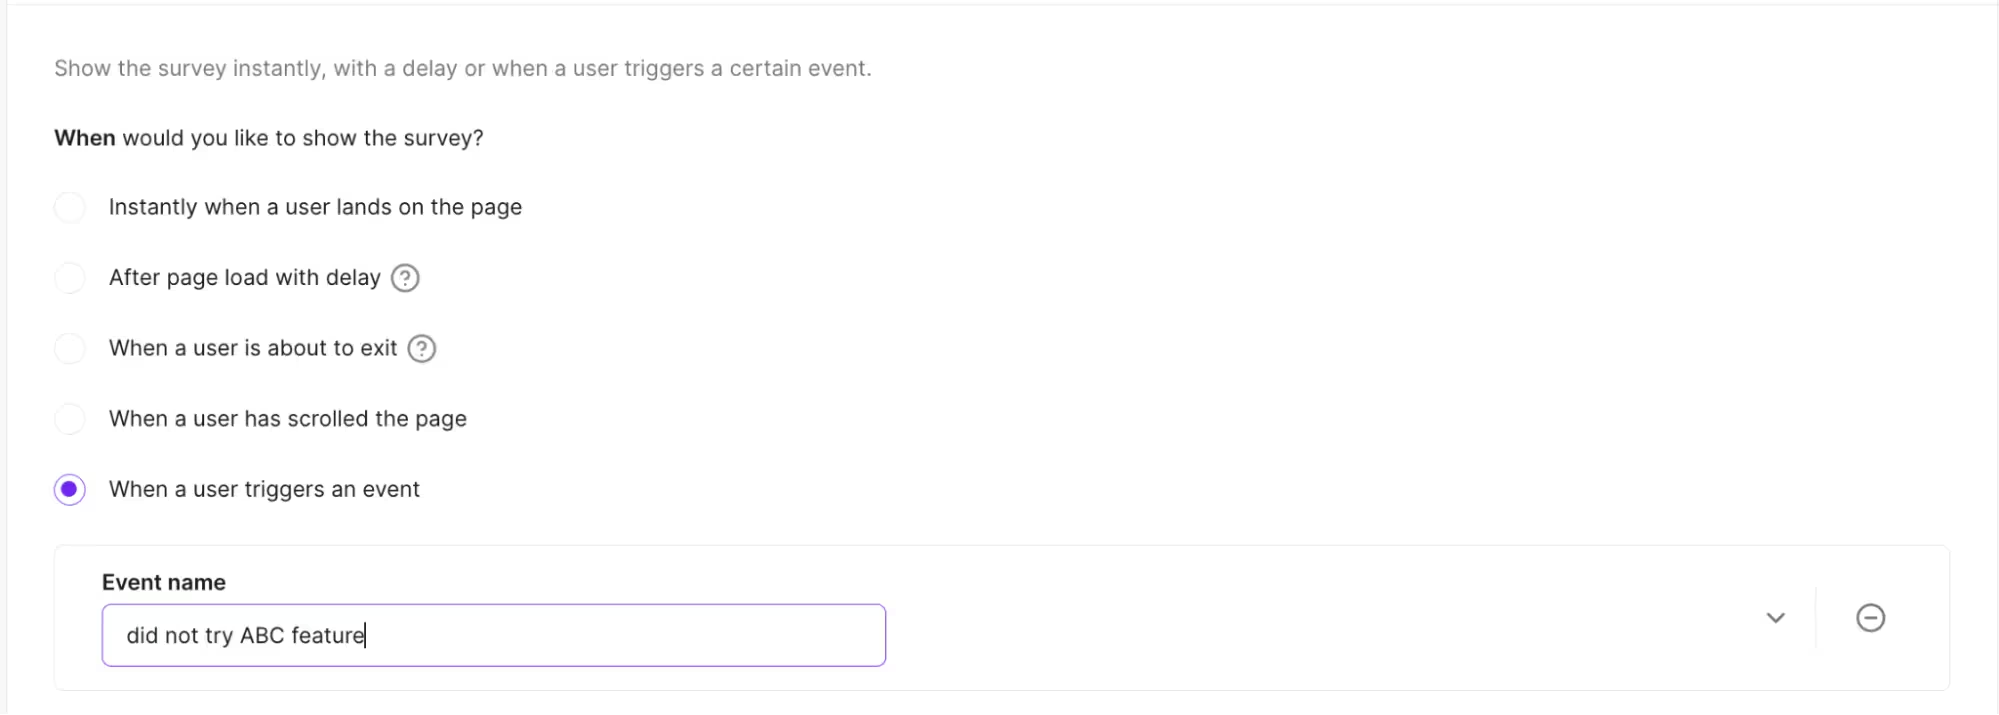
Step 4: Under the Target tab, select "When a user triggers an event" and create the custom event that matches that specific action. Before getting started, just make sure those custom events are already being sent over to Survicate.
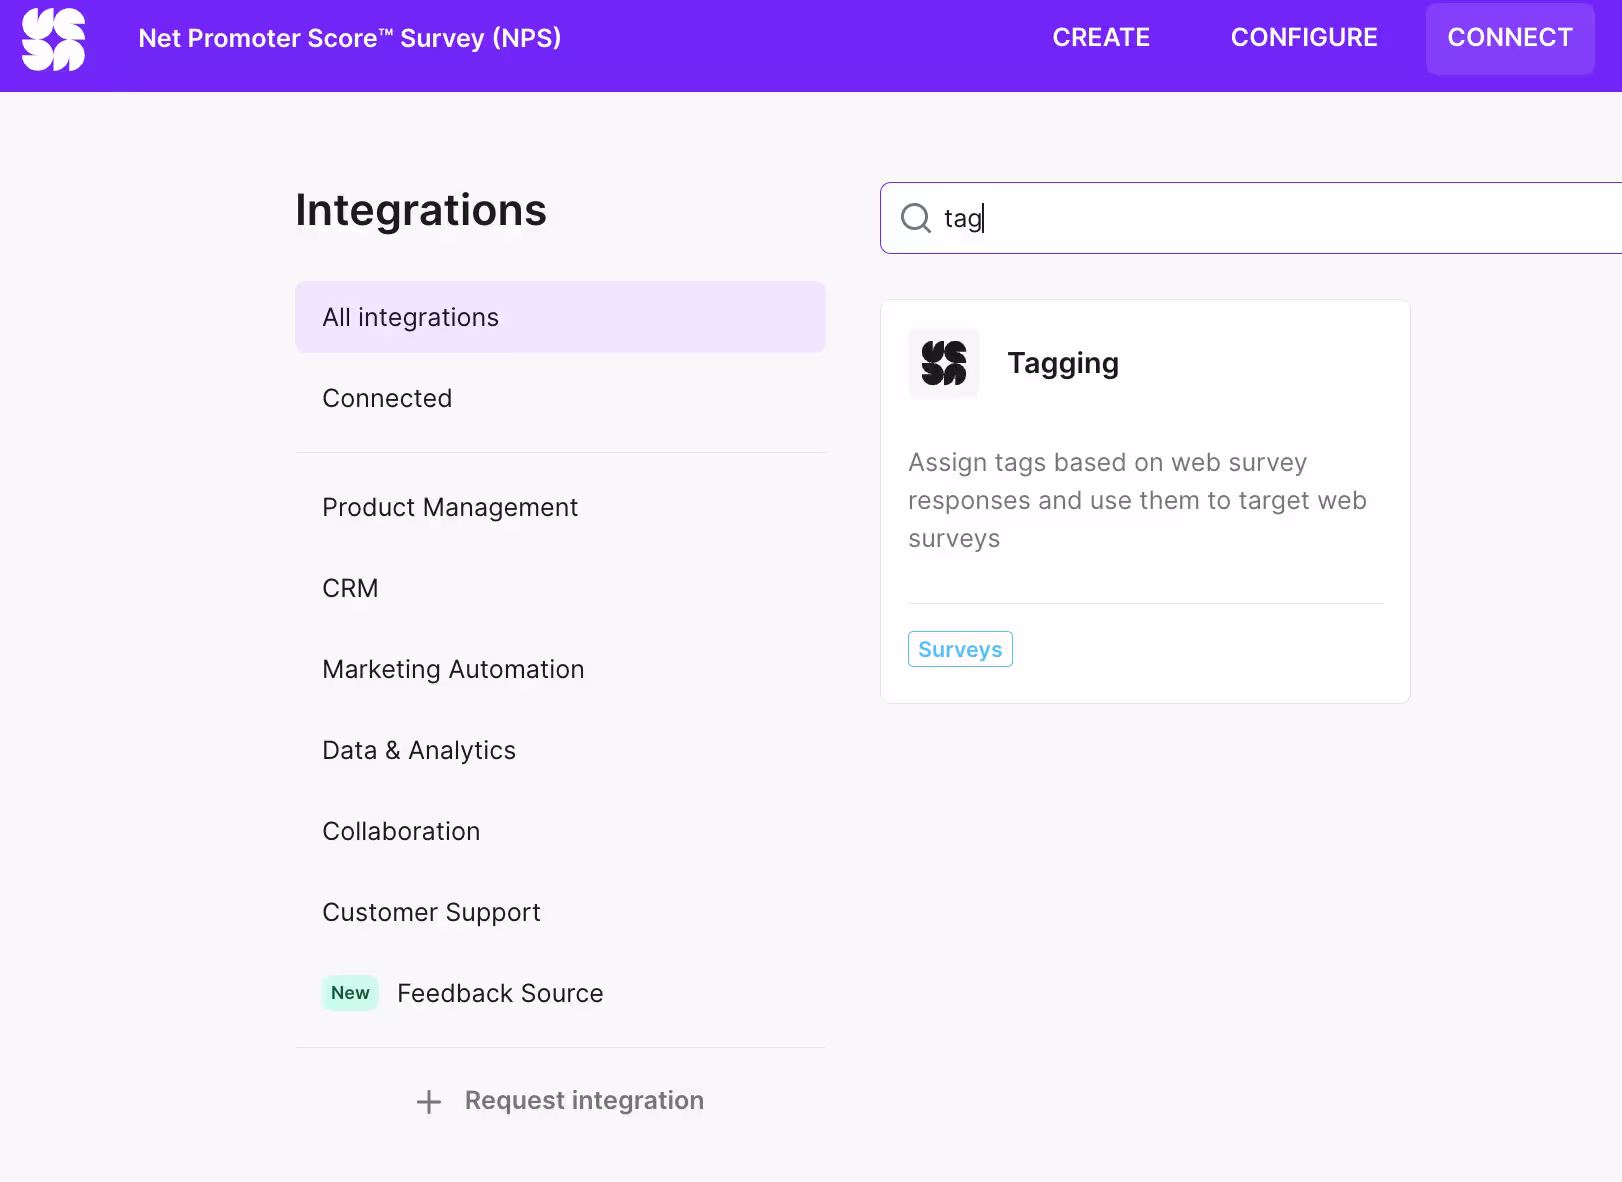
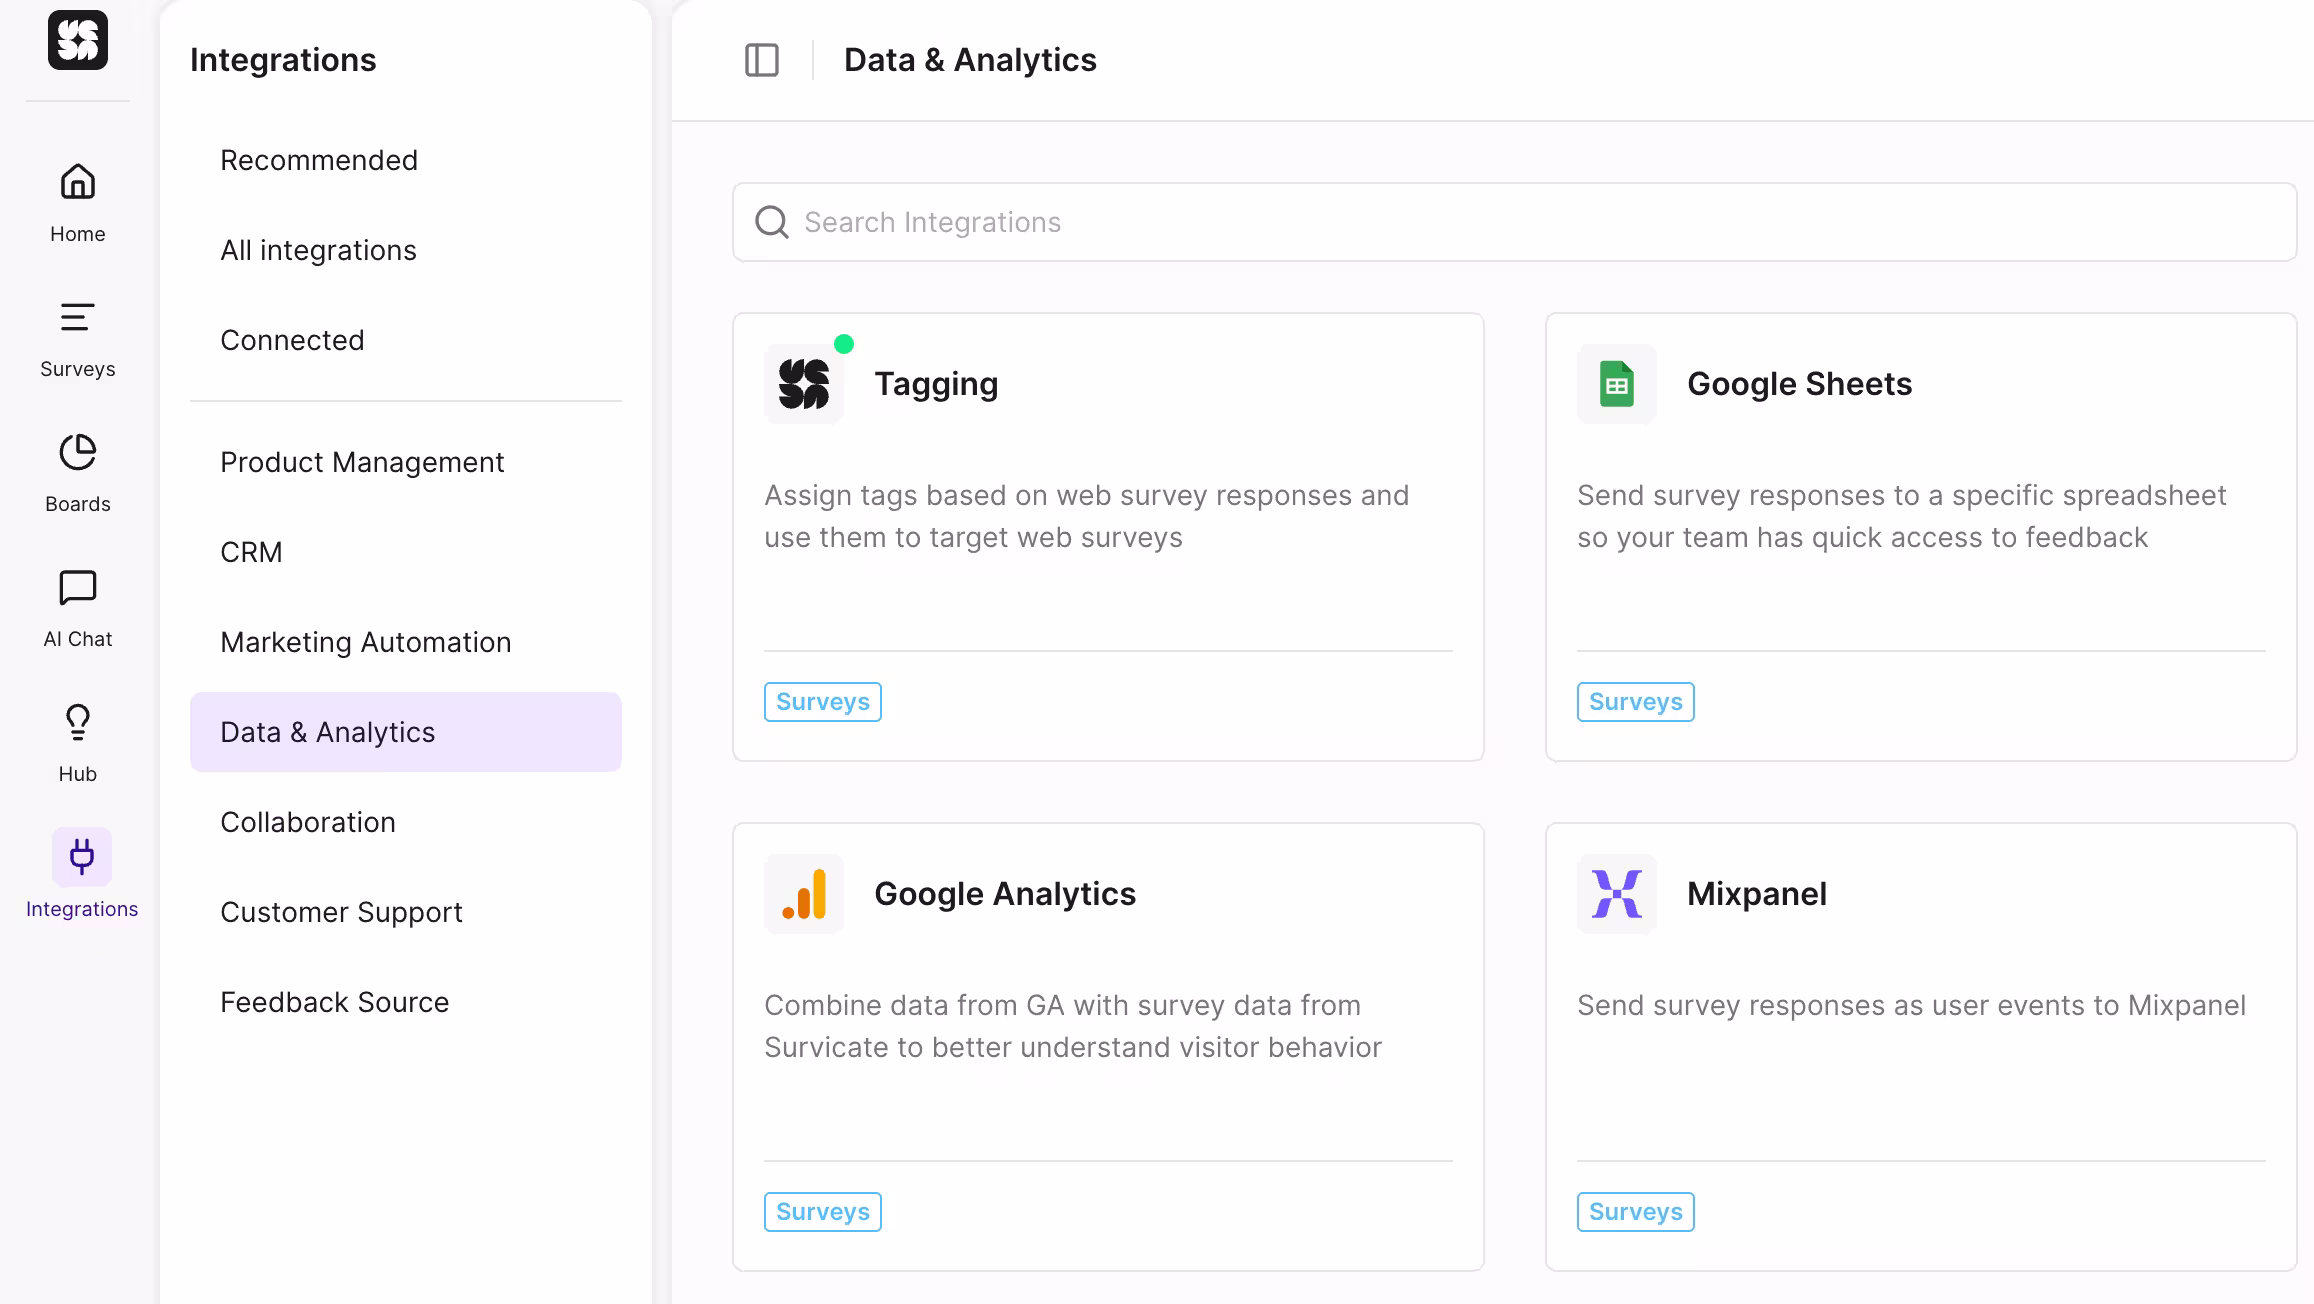
Step 5: Head back to your first NPS survey. To target passive users, specifically, you must enable “Tagging”. Go to Integrations, select All integrations, and in search type in Tagging. Click on it, and choose Connect.
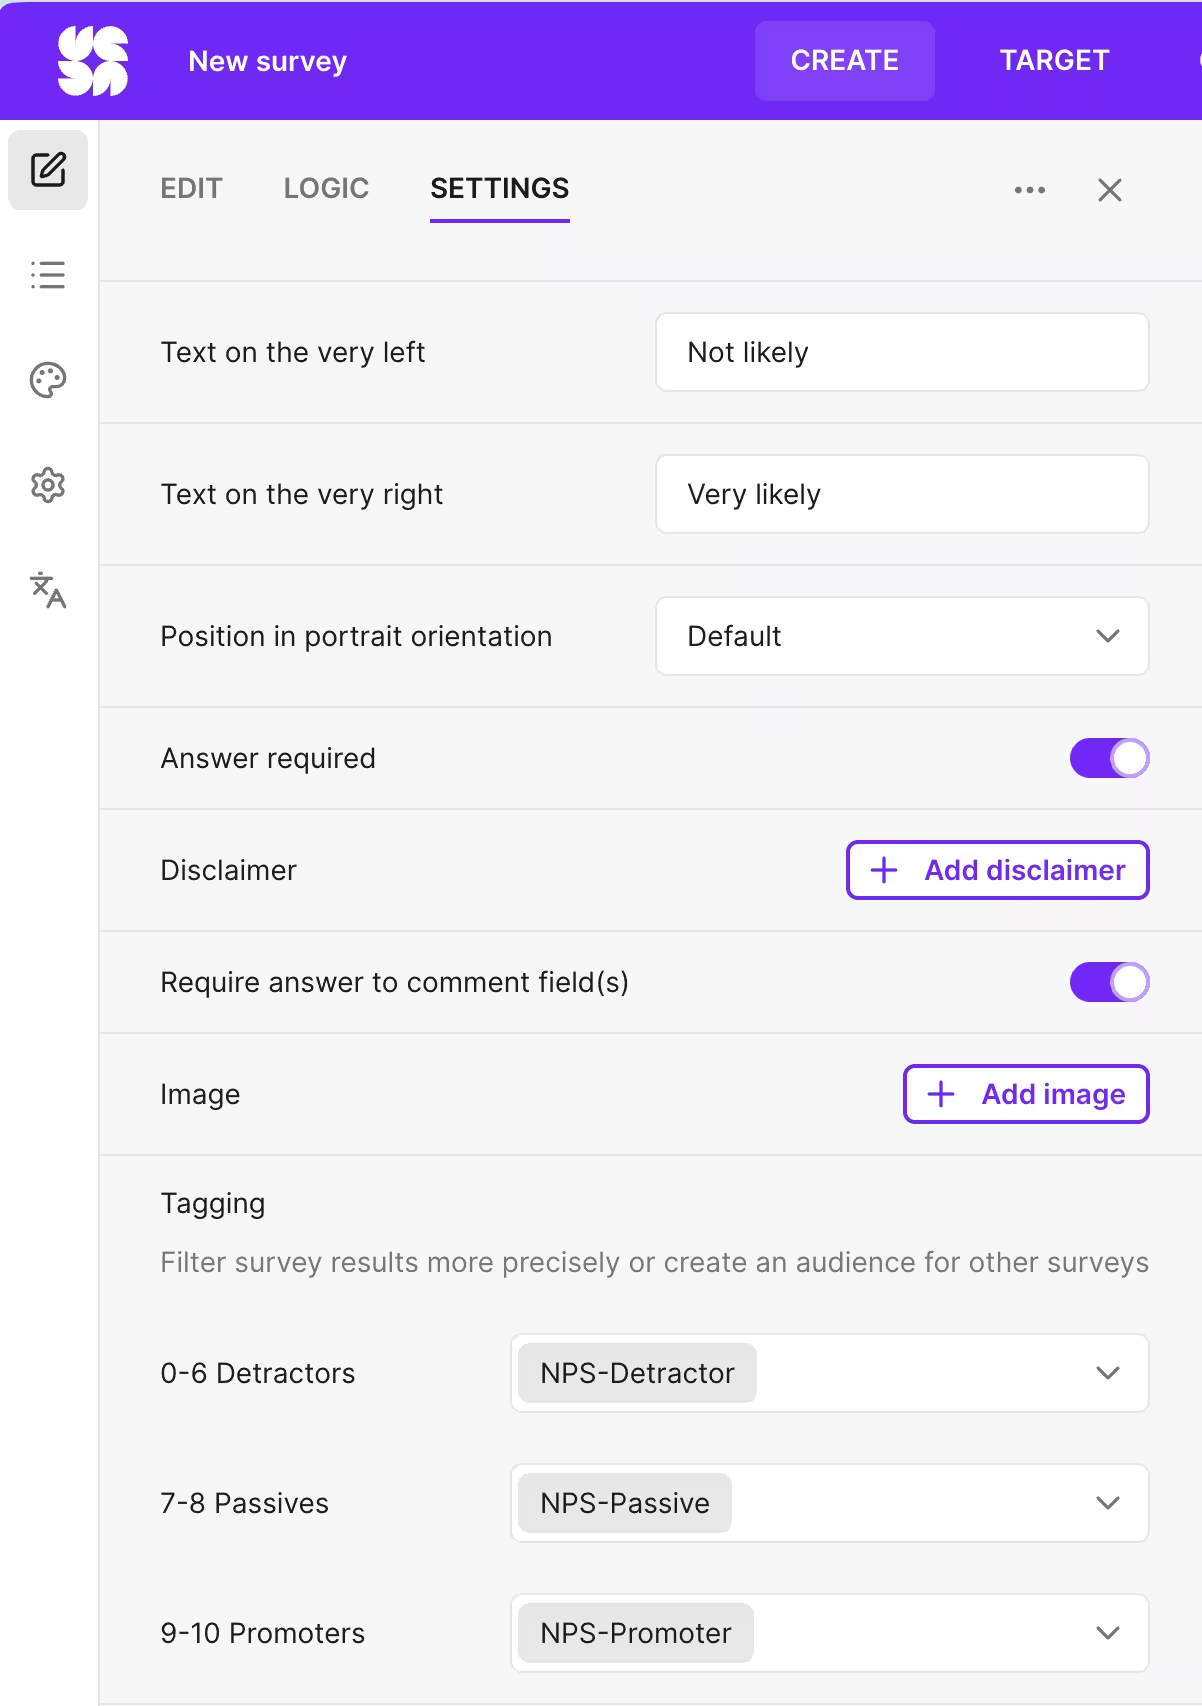
Step 6: Select the Settings for your NPS survey. You should now have the possibility to tag your Promoters, Passives, and Detractors.
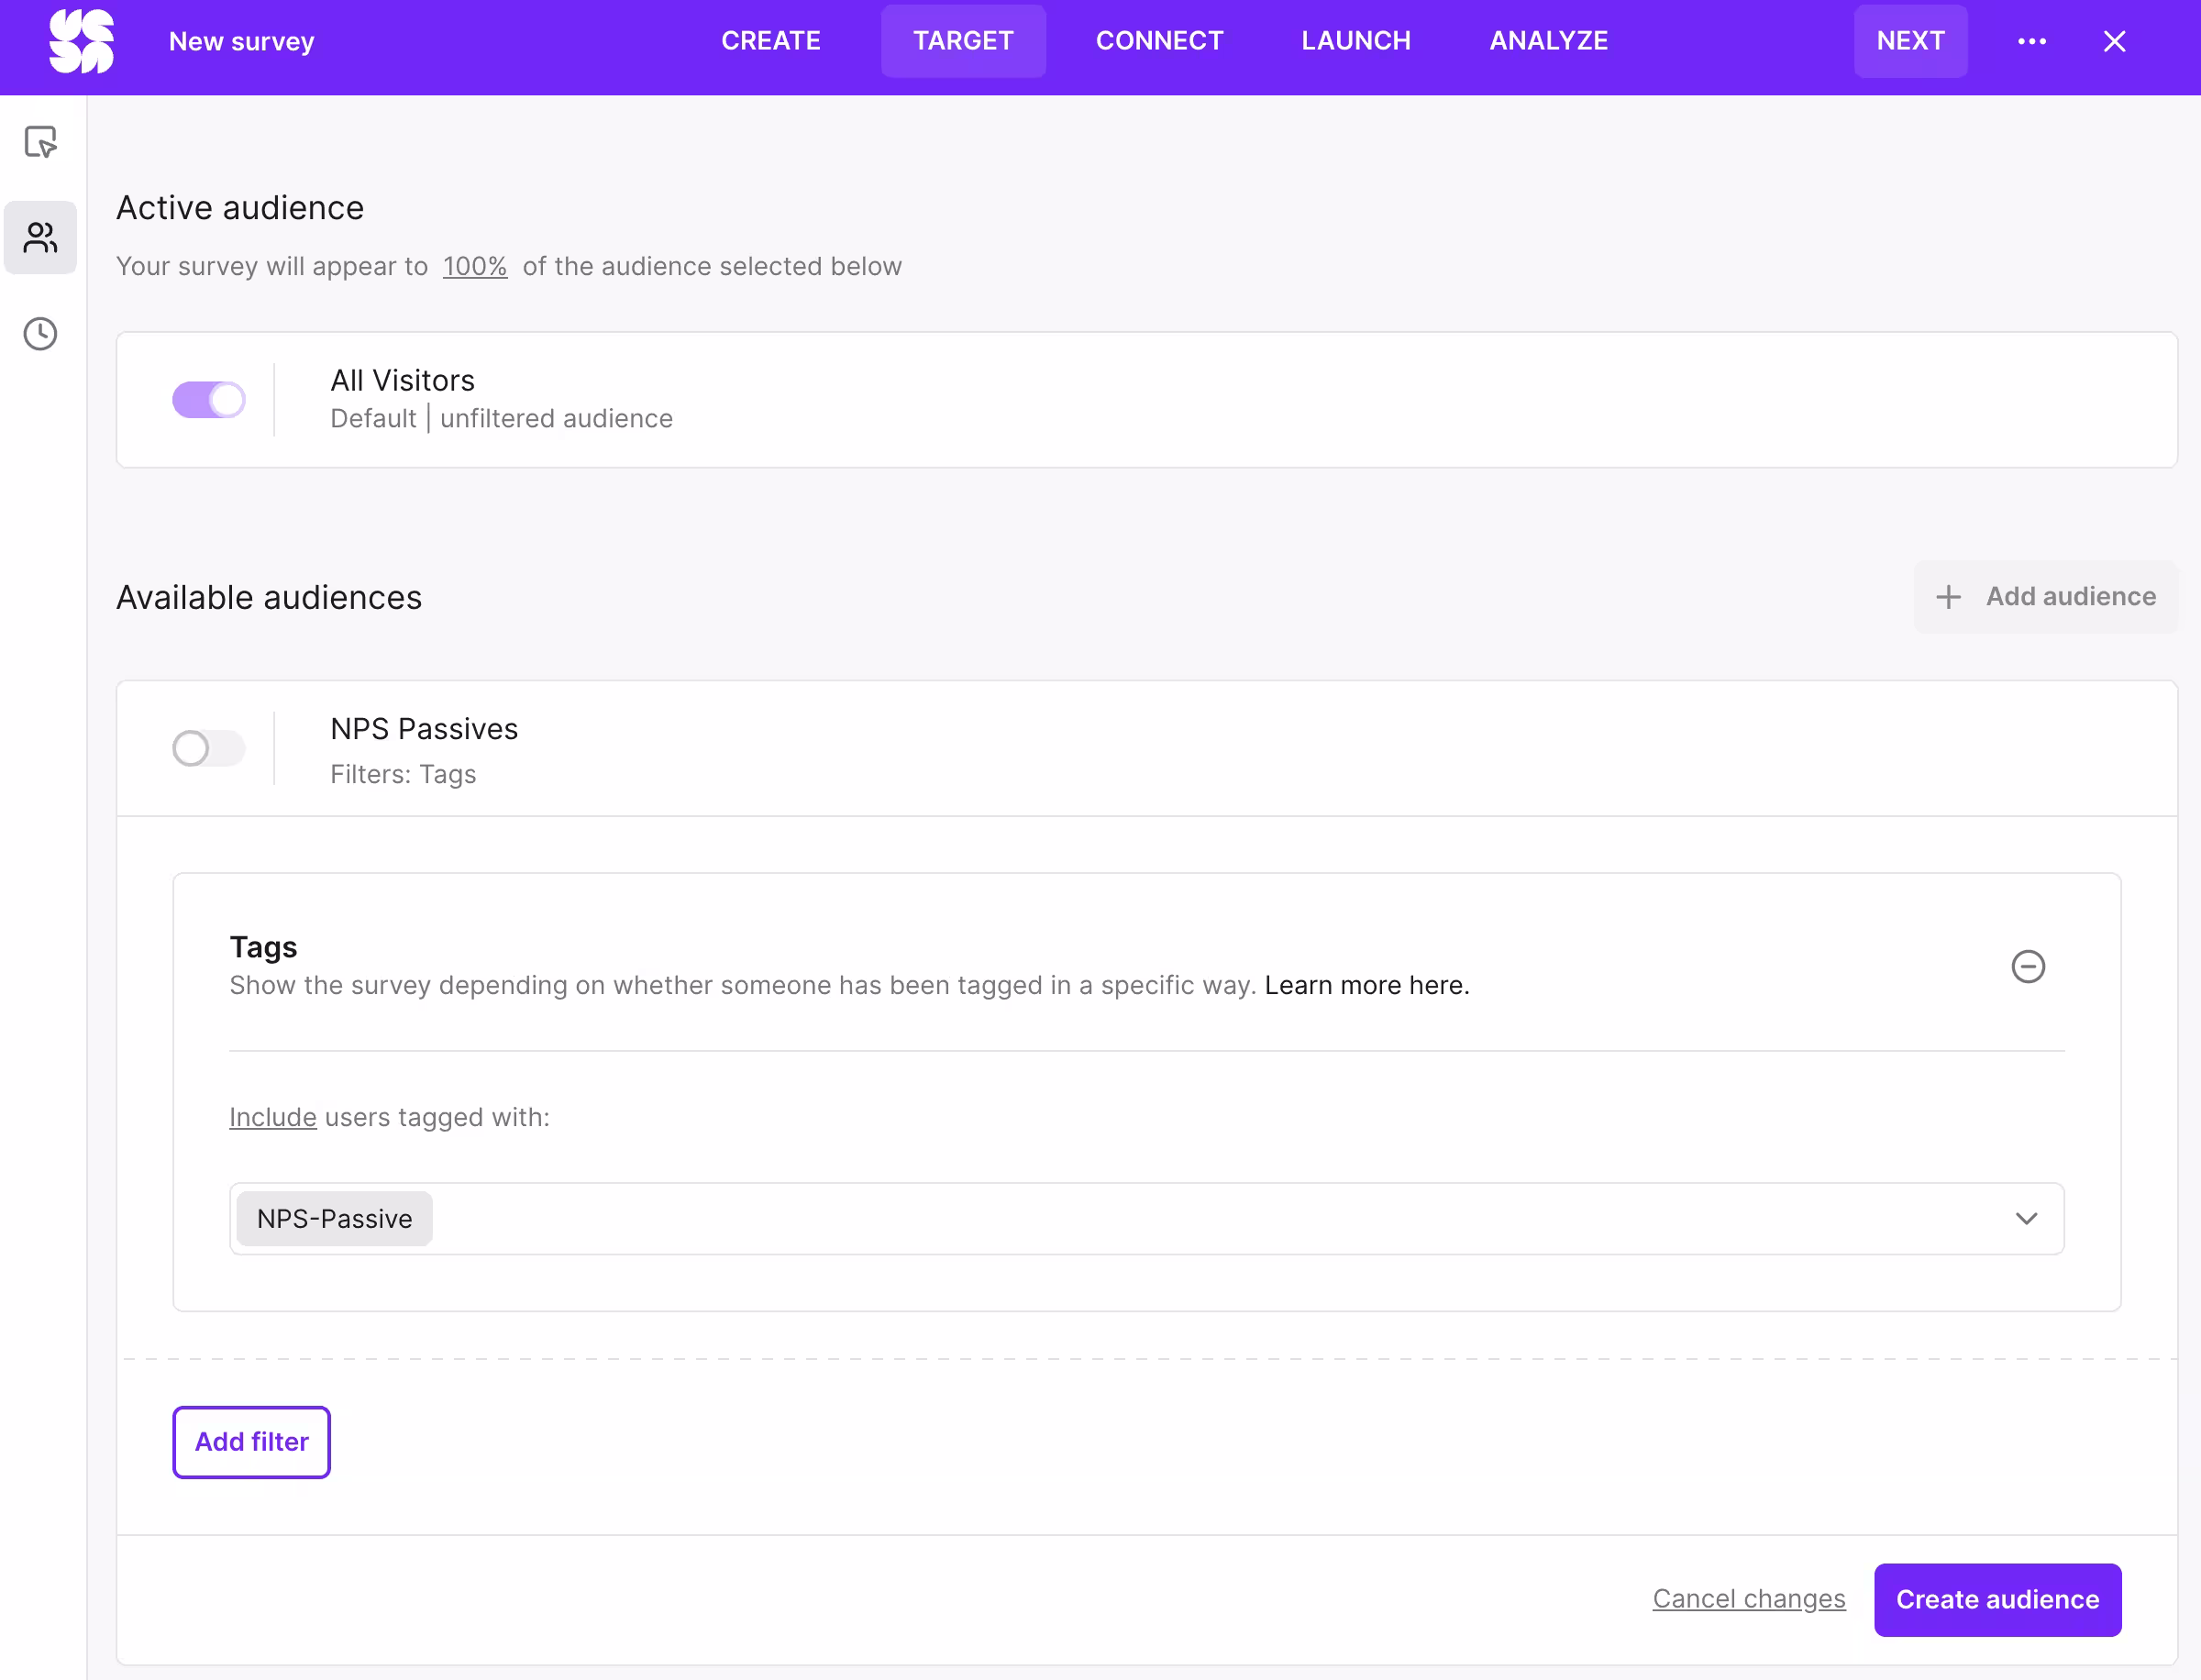
Step 7: Go back to your new in-product survey, select Target and Audience, and create a new audience based on your tag for NPS Passives. Important: Don’t forget to enable the audience after you’ve created it!
#3: Cross-reference passive NPS responses with product analytics to spot the behavioral gaps
You don’t have to guess why users are underwhelmed. Map passive NPS scores directly against real-time product analytics.
The behavioral gap between Passives and Promoters is almost always the most direct, actionable answer to "what would it take to move this person to a 9?". When you map NPS scores against usage data like feature adoption rates, session frequency, workflow completion, time-to-value, patterns emerge that survey data alone can't show.
How to do it in Survicate, step by step:
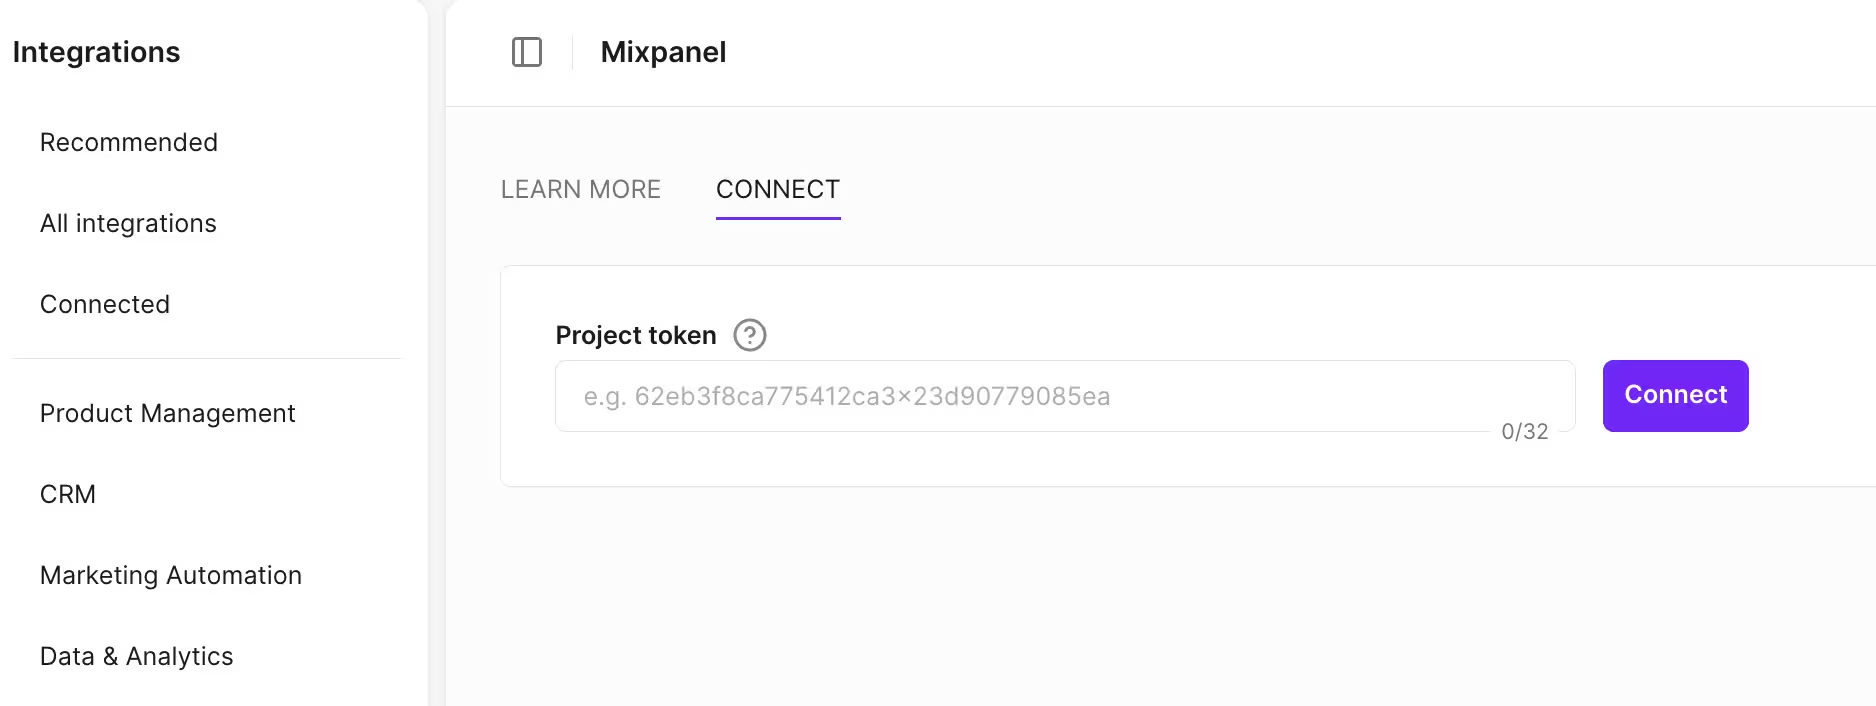
Step 1: To get everything talking, connect Survicate to the product analytics tool you use – like Amplitude or Mixpanel – using the native integration.
Step 2: Configure Survicate to send those NPS scores over as user properties or events. If you use Mixpanel, grab the project token from the Mixpanel settings to get everything synced up. Once that is set, every score becomes a filterable attribute right alongside behavioral data, making it easy to see the full story.
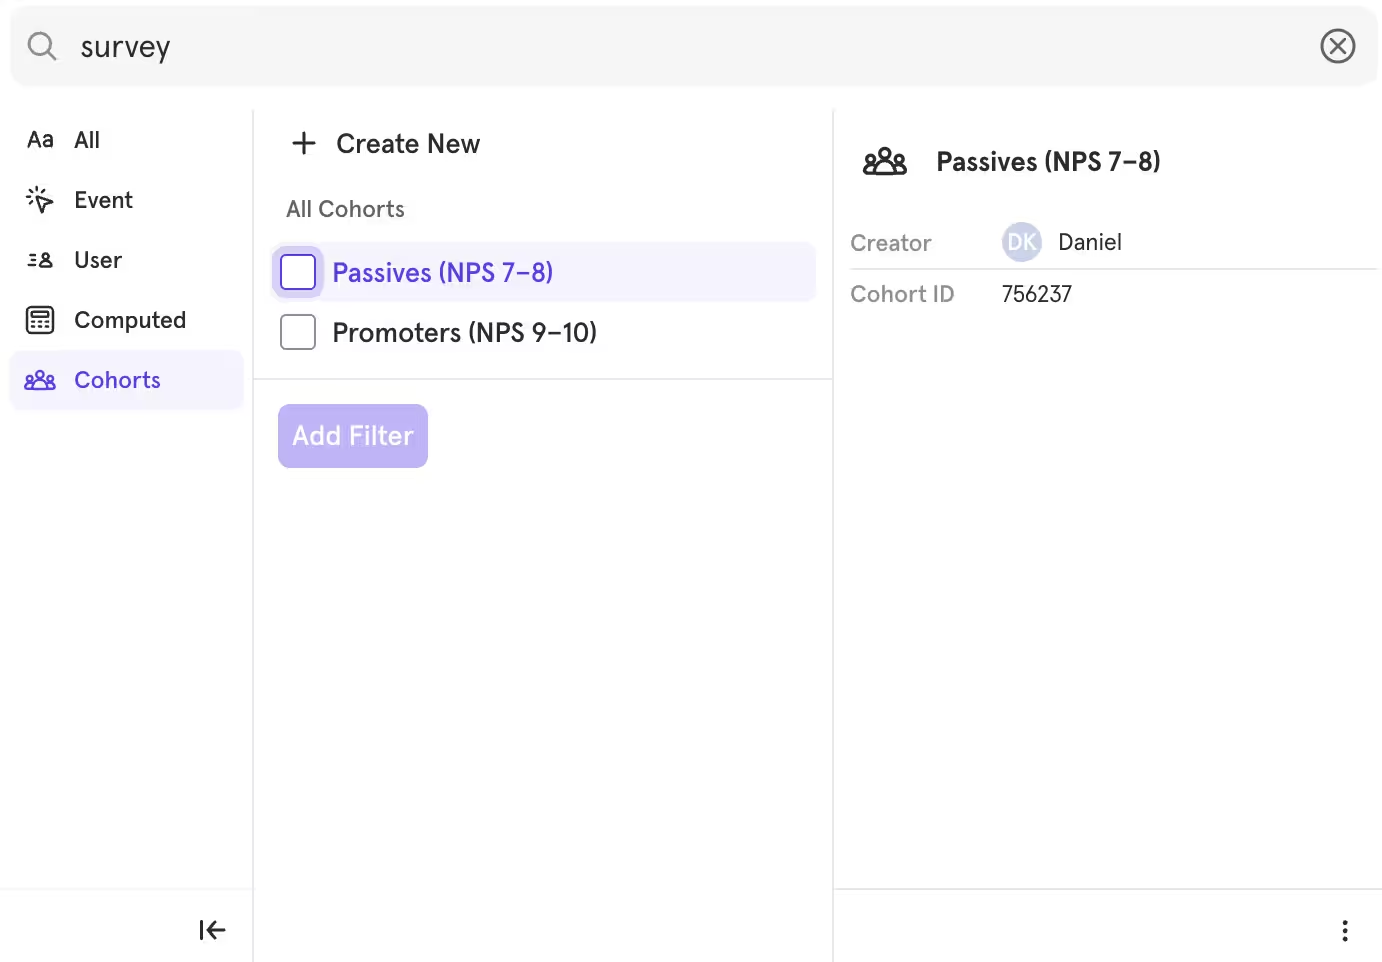
Step 3: Inside your product analytics tool, create two distinct cohorts: Passives (NPS 7–8) and Promoters (NPS 9–10). Comparing their behavior across key metrics – like how often they finish a workflow or how much time they spend on core features – is the best way to see where the paths diverge.
The goal is to pinpoint the two or three behaviors that really set these groups apart. Look for the specific features Promoters love that Passives seem to ignore, or the workflows that Promoters breeze through while Passives tend to abandon.
Step 4: You’ve already identified a pattern, but there will still be Promoters whom you’ll need to exclude from the response list to filter them out from Passives. You can do this using audience filters and checking the “has not triggered X event” box.
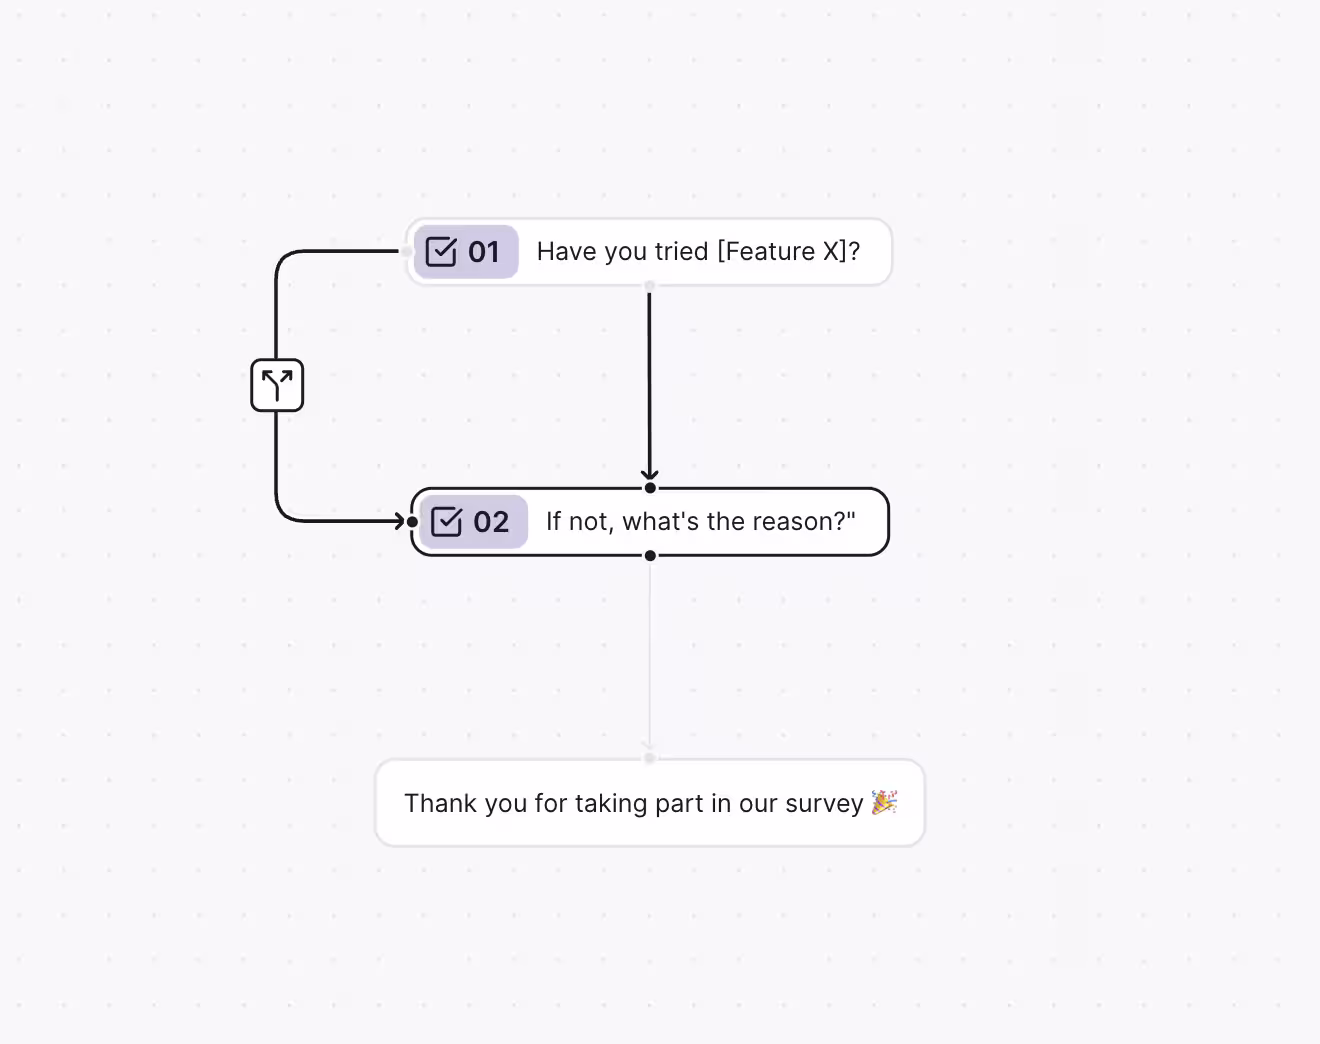
Step 5: Now, you can create a targeted in-product survey for Passives who haven't yet ticked those key behaviors. A direct question like "Have you tried [Feature X]?" works perfectly to turn those analytics findings into real, qualitative insights.
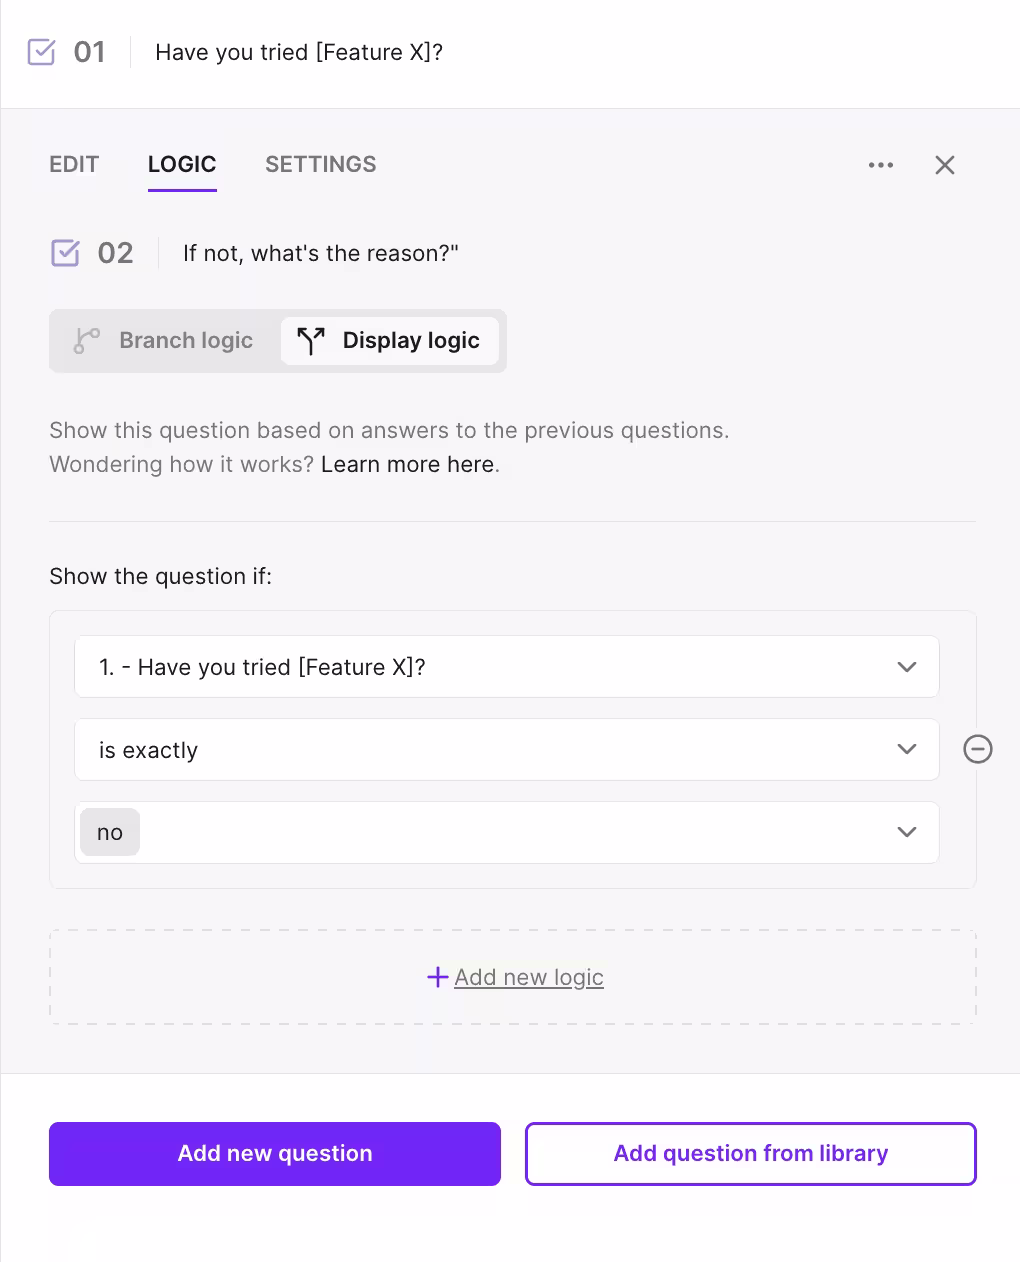
Note: Using a multiple-choice question is essential here to make the skip logic work correctly. Head to the Logic tab and set the criteria so the follow-up question (asking why they haven't tried it) only appears if the answer to "Have you tried [Feature X]?" is exactly "No."
Step 6: You can analyze the incoming survey responses in Research Hub or via the AI chat.
Note: A great trick is to re-survey Passives as soon as they start acting like Promoters, rather than waiting for the next 90-day cycle. By triggering a survey via a Segment event the moment that behavior shifts, score movement can be captured in real time.
How research teams can discover what Passives need
#4: Find out what opinions Passives have in common
Start extracting high-quality "qualified criticism" by looking at what NPS Passives commonly bring up in their open-ended responses to surveys. By looking at patterns among this group, you can identify the ideal candidates for deep-dive user interviews.
This proactive research will help your customer success team act before Passives’ constructive feedback turns into quiet resentment.
How to do it in Survicate, step by step:
Set 1: Go to your NPS survey. Click on the Filter tab.
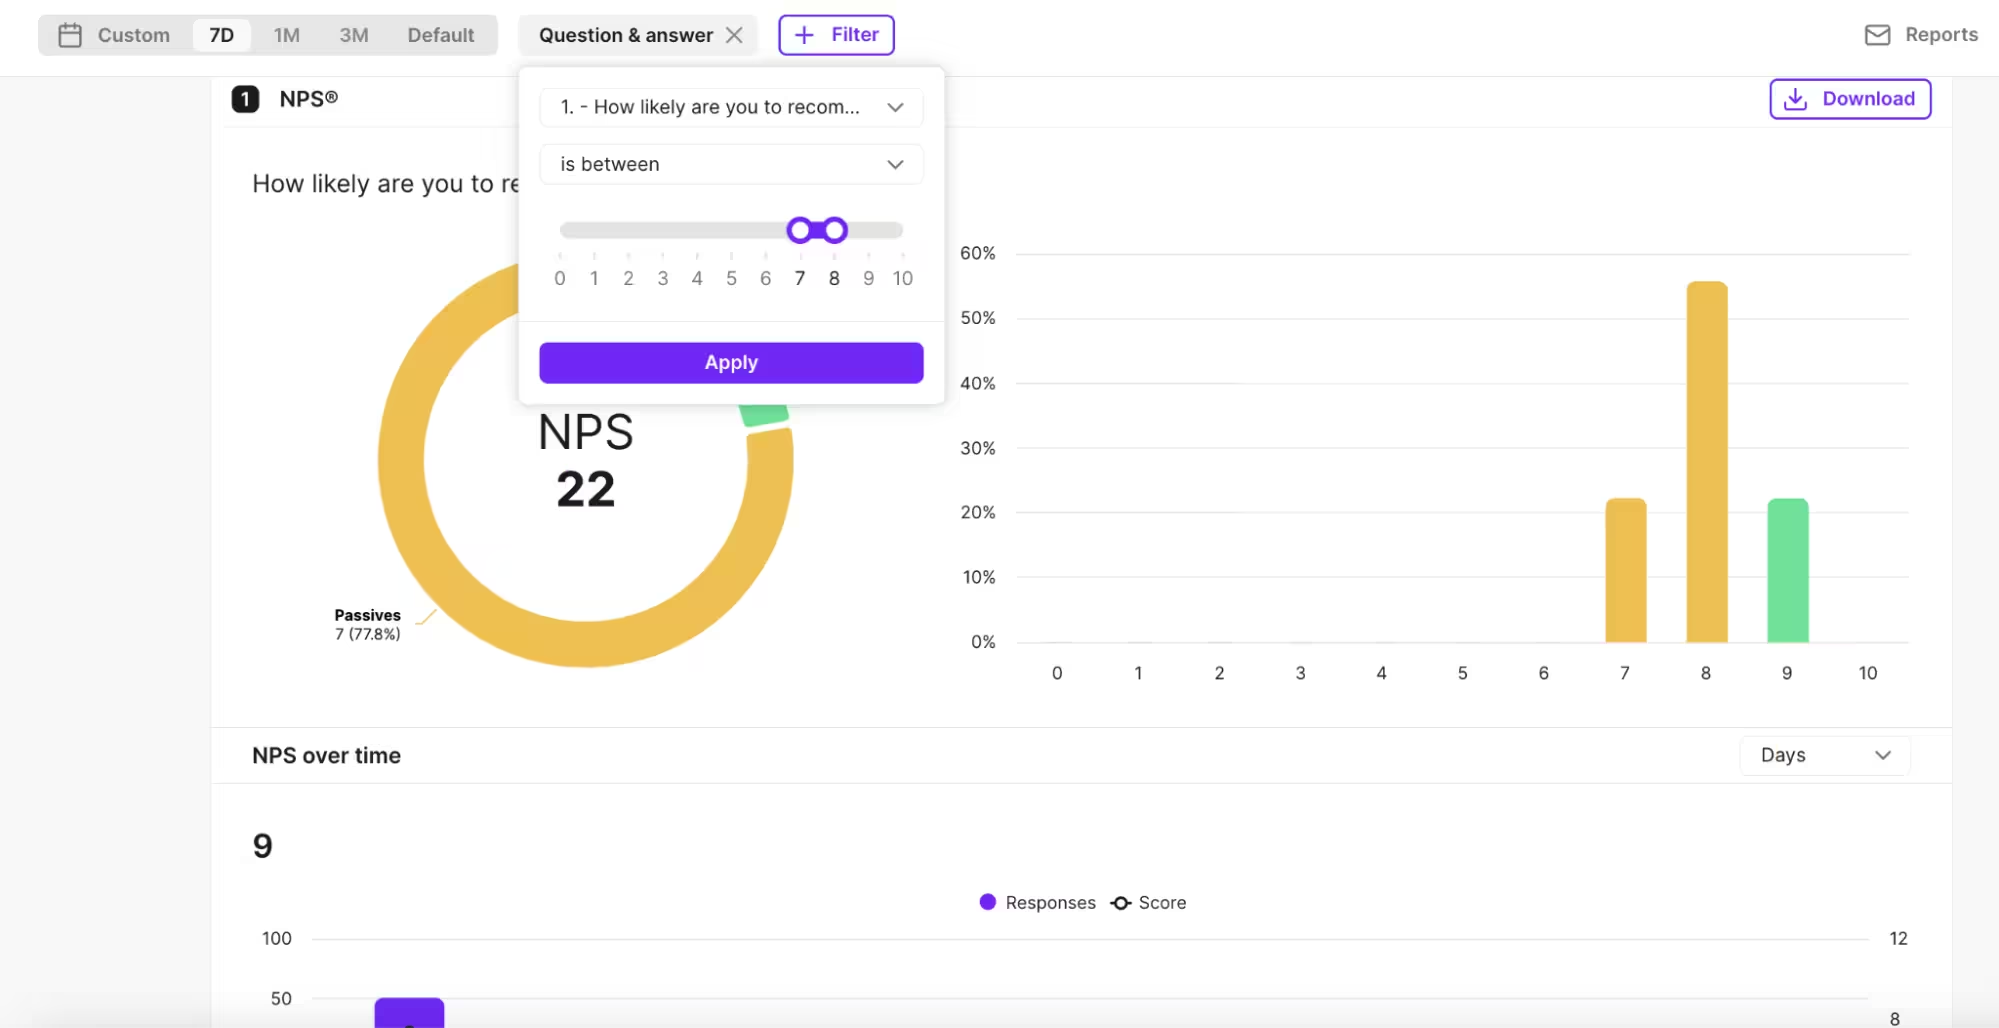
Step 2: To keep things focused, just filter by Question, then Answer, and select 7-8 to zoom in specifically on the Passives.

Step 3: Scroll down to see a list of answers from all that open-text feedback. We recommend clicking on Insights, to see a summary of what most Passives mentioned. This takes the guesswork out of reading through every response. It’s a great way to quickly spot the main reasons those passive users aren't fully committing yet.
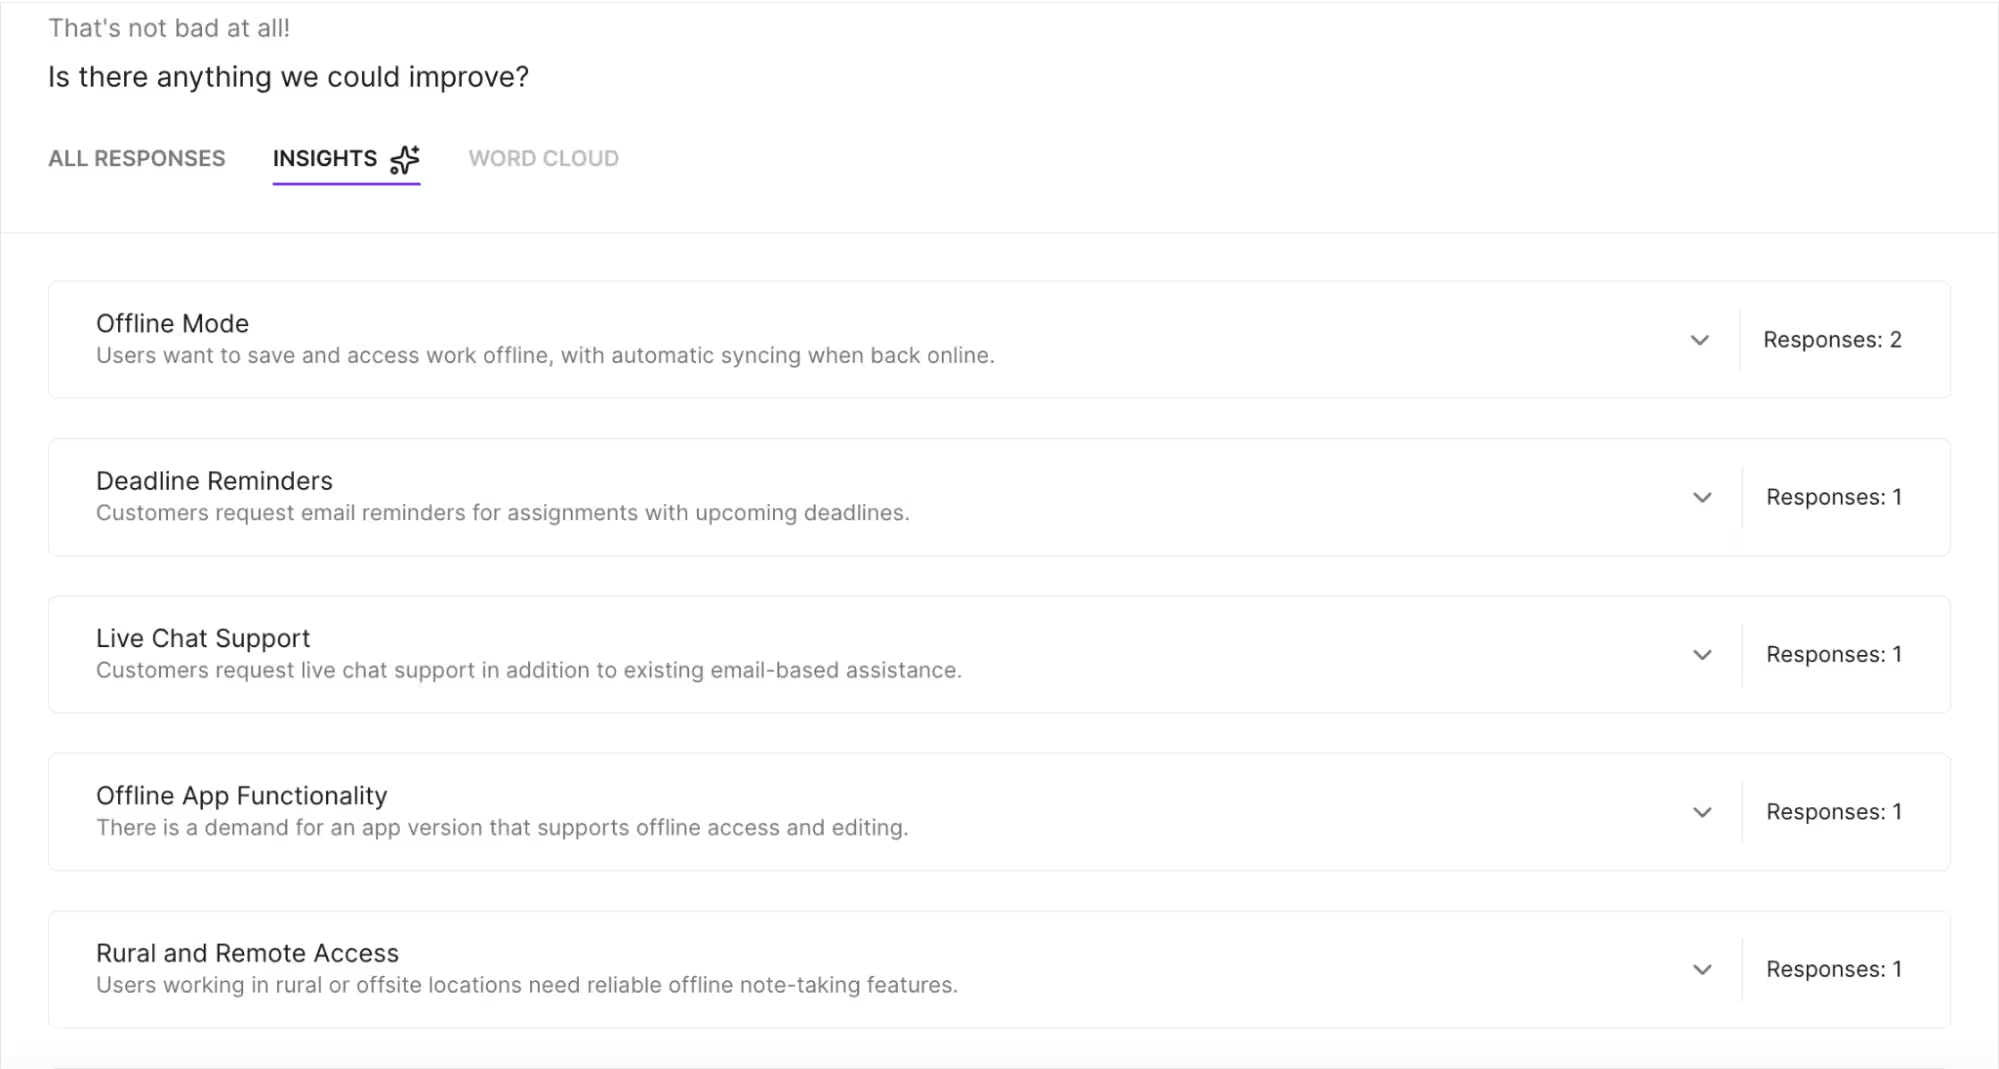
Step 4: Treat these findings as a perfect jumping-off point for your next research project. Instead of guessing, there is now a clear map of why some users are stuck in the middle and what might nudge them toward becoming fans.
How CS/CX teams can turn Passives into Promoters
#5 Build the voice of the passive customer beyond "just fine"
It is so easy to look at a sea of 7s and 8s and think everything is "fine." Since these people aren't complaining, it feels like they’re happy enough. But the reality is a bit more human – that neutral ground is actually a state of fragile satisfaction.
Being "satisfied" is only the very first step on the long road to loyalty. It’s a bit like a polite first date; it went well, but there’s no real emotional spark or deep commitment yet. Without that extra nudge, these users are just one shiny new competitor away from moving on.
To bridge this gap, CS and CX teams are shifting their focus from high-effort detractor recovery to "easy wins" with Passives. By systematically building a voice of the passive customer, the minor frictions that lead to lapsed contracts can be uncovered while there is still time to fix them.
How to do it in Survicate, step by step:
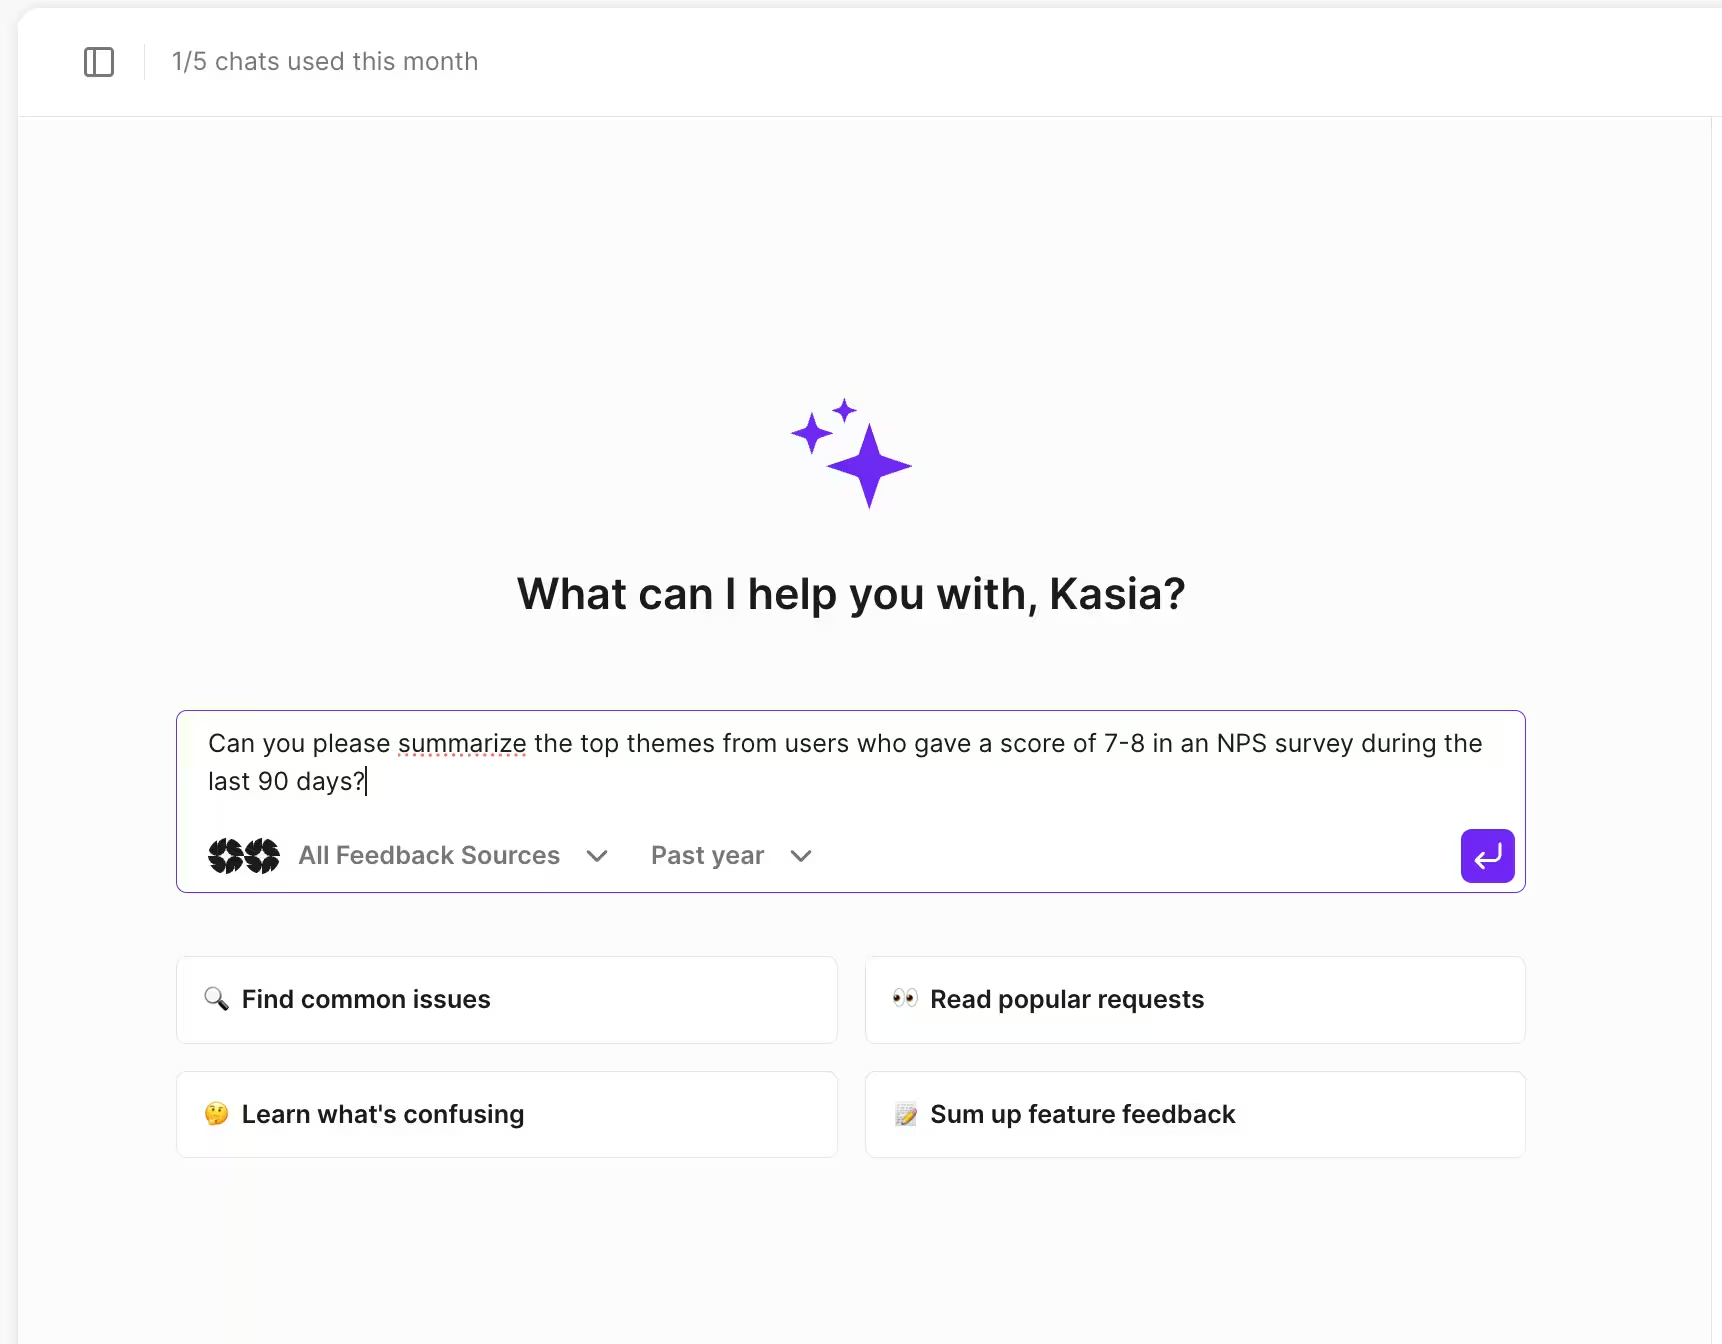
Step 1: Ask the Research Assistant to summarize the top themes from users who gave a score of 7-8 during a specific time range. It’s a huge timesaver because it sifts through all those open-ended responses and serves up a neat summary of what's on the minds of those passive users.
Step 2: Compare these themes with the themes you're seeing across multiple sources. You can ask the Research Assistant if this is consistent with what we're seeing across support tickets, customer interviews, and other feedback sources.
You can also use these themes to back up what you're seeing across product analytics, or when meeting with your voice of the customer council.
It will become clear that your passive segment is worth listening to as an early indicator, ahead of them becoming Detractors. Doing this should help you build a product or customer strategy that feels more proactive than reactive.
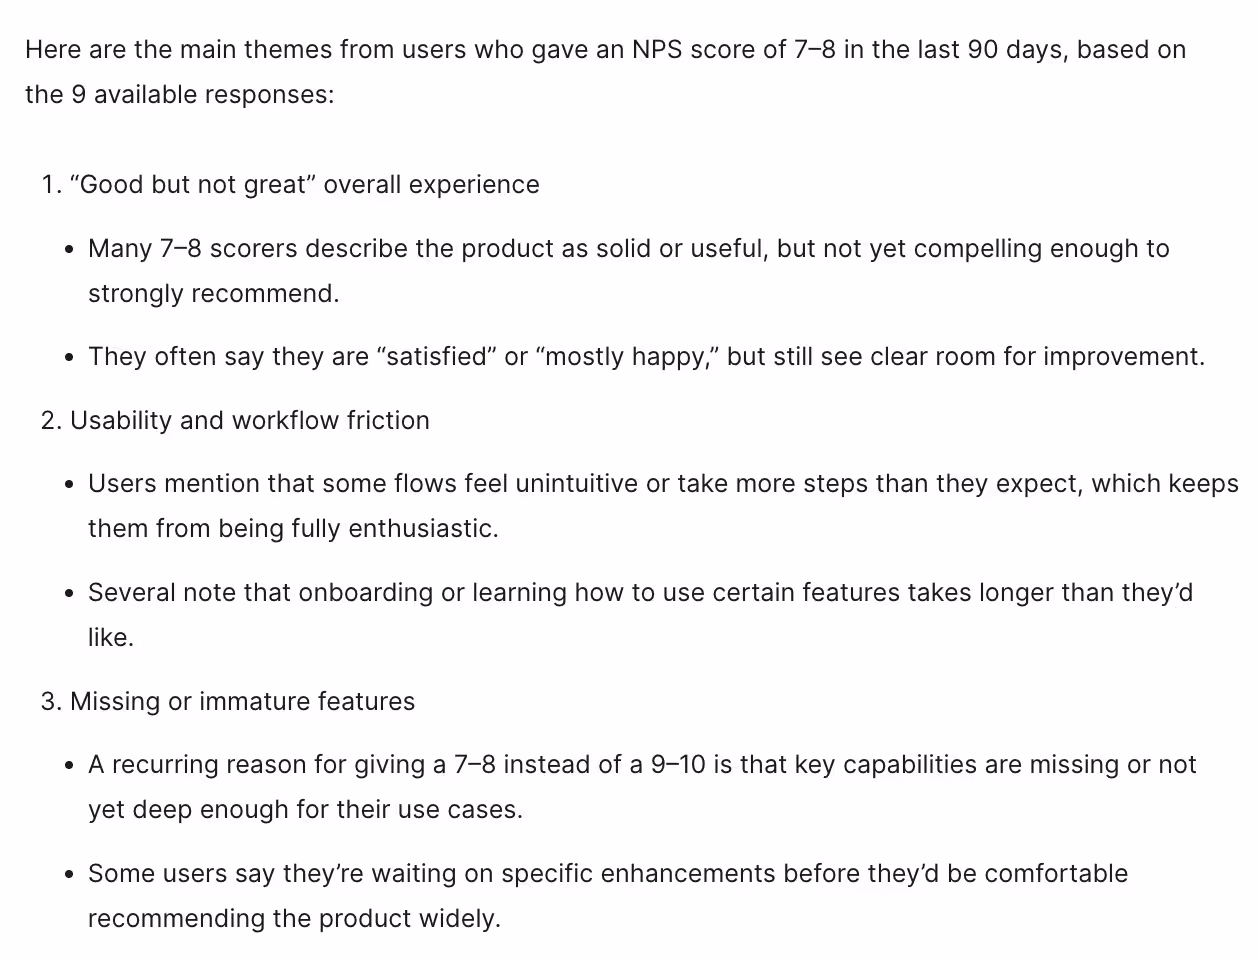
Notice how the Research Assistant summarized the key improvement areas:
#6: Run a Research Project on Passive-Only Responses to Triangulate "We Like It, But..." Signals
When a passive says "I like it, but the reporting could be more flexible," that sentence is precise and calm in a way that neither a promoter nor a detractor would produce. This makes passive-only responses the highest-quality raw material for research that informs real product decisions.
Passives who write detailed, thoughtful open-ended responses are often ideal candidates for a 30-minute user interview. The interview transcription and NPS response will serve as an ideal backdrop for triangulation, enabling you to properly verify whether the feedback reflects a larger issue.
How to do it in Survicate, step by step:
Step 1: Go to the Panel, select Surveys, and “Create new survey.” You can “Start from scratch,” then select the appropriate format for your survey. Add your first question and select NPS.
Step 2: Next up, you can either create a Single answer selection question that politely asks if the respondent is open to share more feedback on a 30 minute call (yes/no answer selections). Or, like in this case, we keep it short and sweet with a Thank you screen, where you encourage the respondent to follow the CTA button for an interview booking.
We only want to display this message for Passives, so we head over to Logic, select Display logic, and ensure that you “Show the question if”:
- Select the previous NPS question
- is between
- 7 and 8
Switch to the Settings in order to enable a button, add your booking link (such as Calendly), and write your CTA.
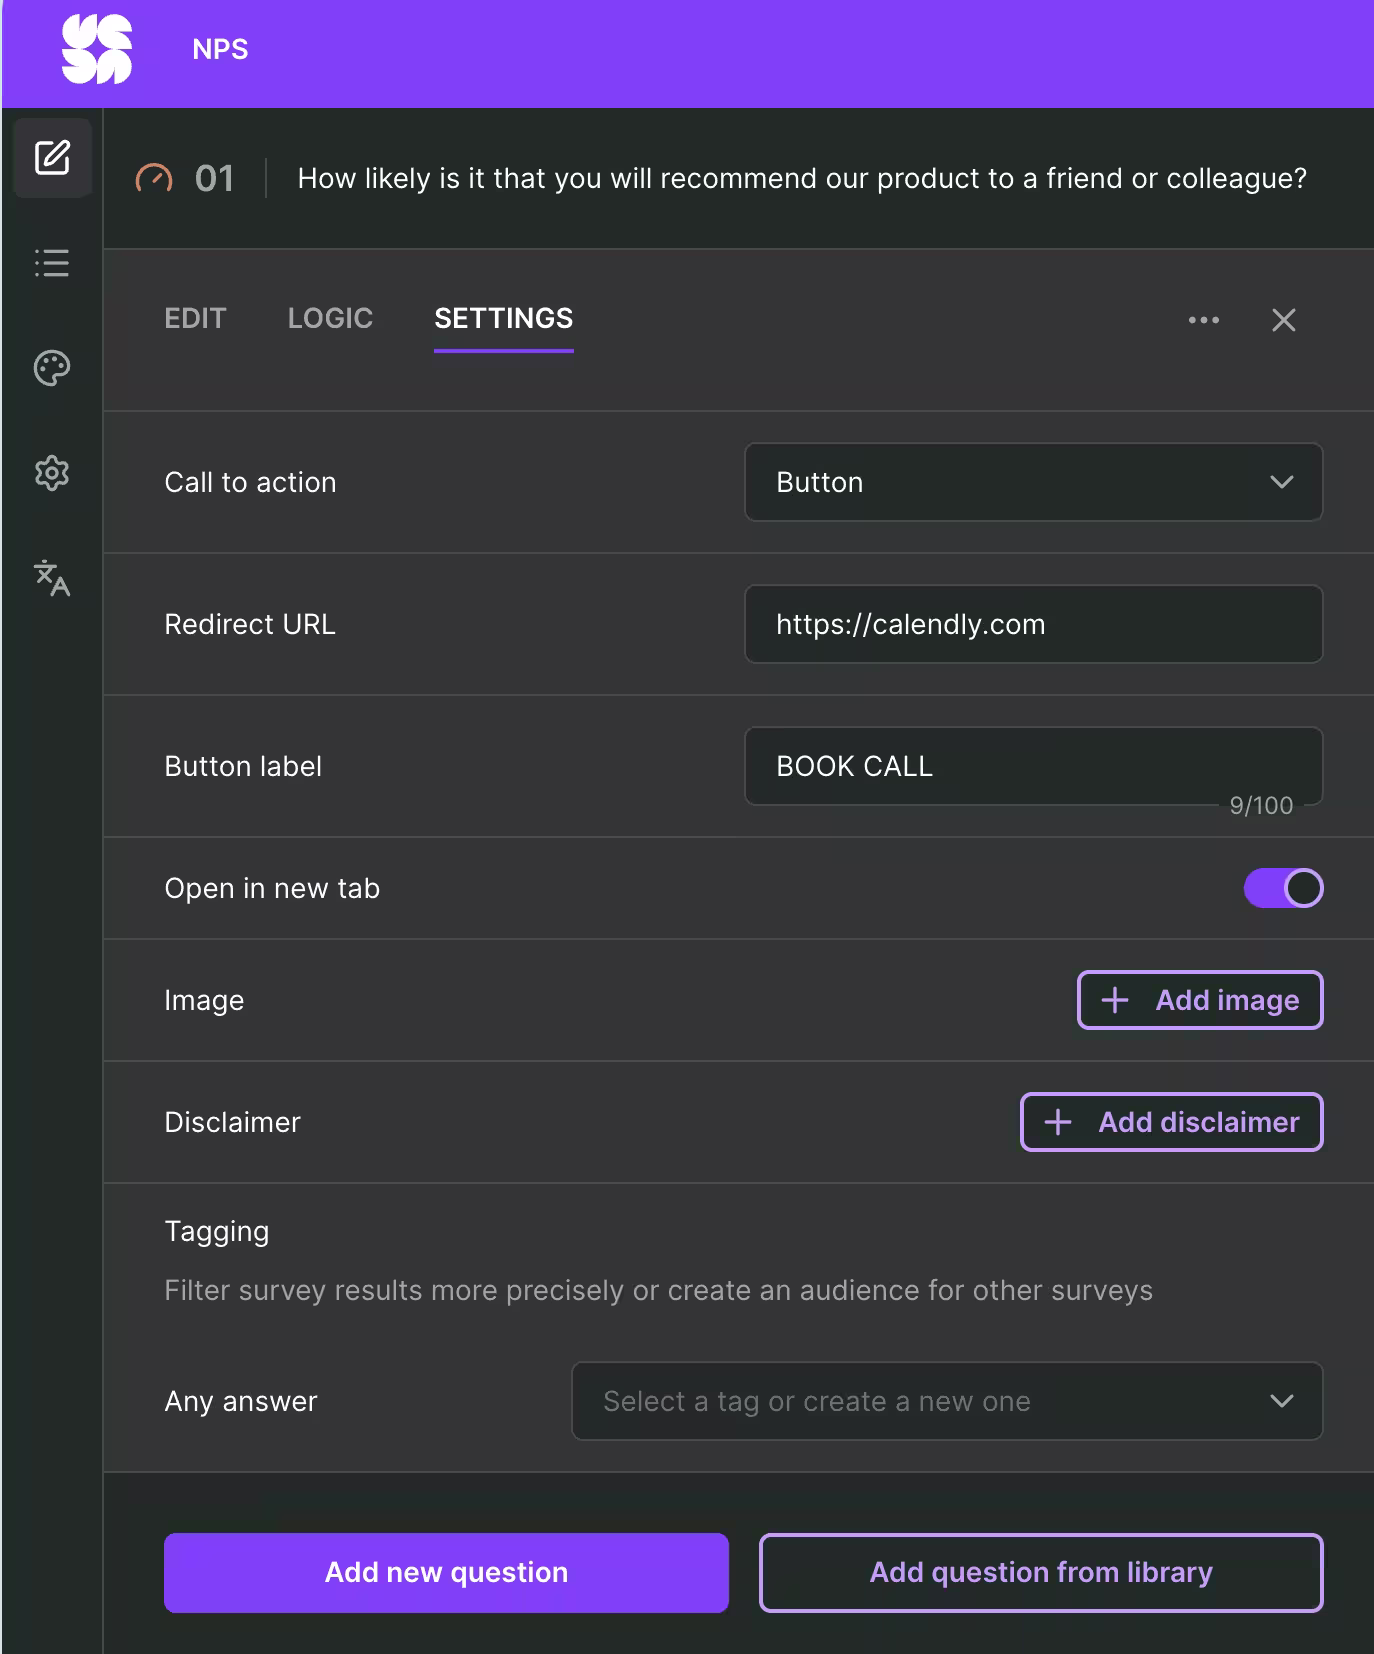
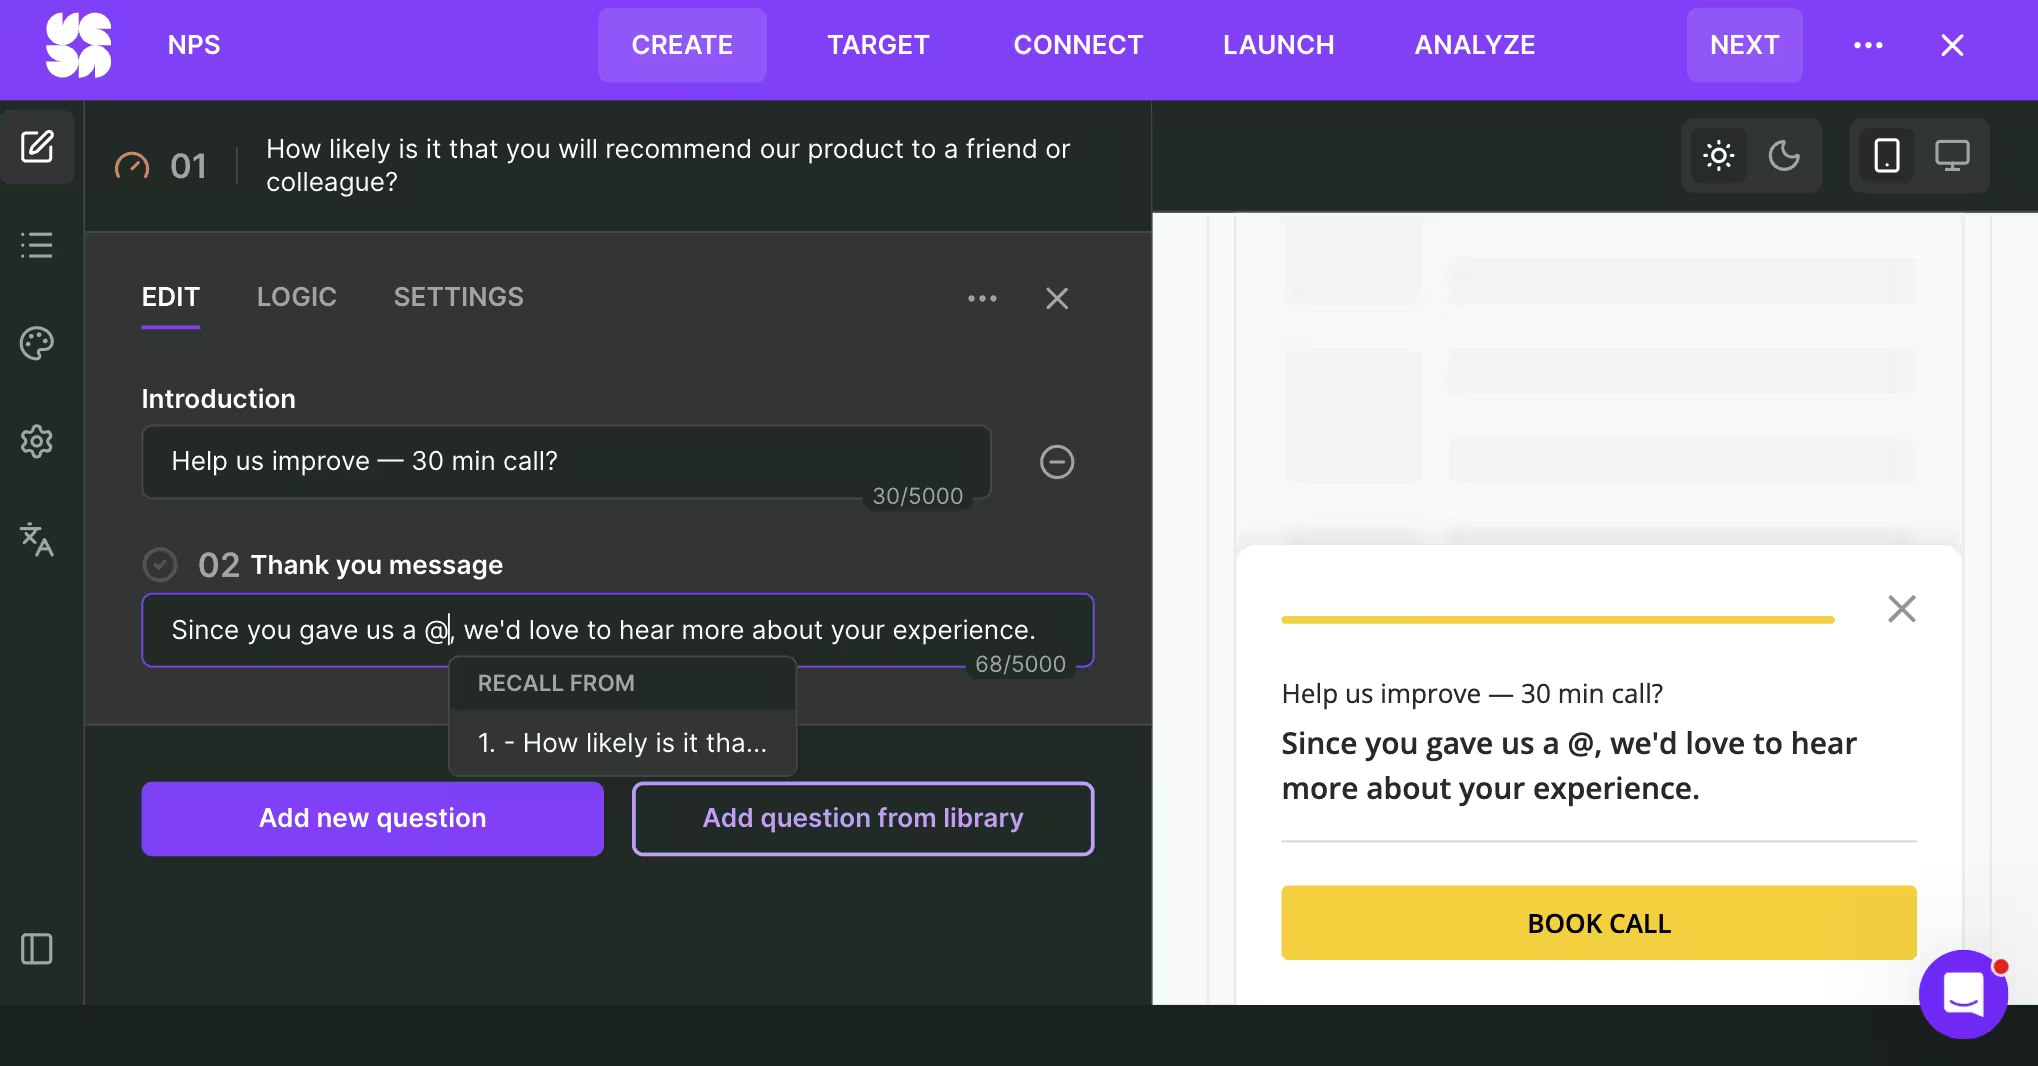
Then head back to Edit to formulate your message. Something like this will do:
- Introduction: Help us improve — 30 min call?
- Message: Since you gave us a [score], we'd love to hear more about your experience.
To recall the respondent’s NPS score dynamically into our message (so-called survey piping), simply type @ and select the NPS question. As you type, the desktop and mobile preview to the right will instantly change accordingly. Additionally, I chose to turn off the Survicate branding via the survey Settings.
(For respondents who’ll answer anything other than 7-8, you can create a 2nd Thank you message).
Step 3: Go to Target and ensure you’ve selected any potential triggers and landing pages, to further narrow your survey scope. When you’re ready, launch your survey.
Step 4: Now comes the fun part: with your calendar (hopefully) automatically being populated with booked interviews, it’s time to dive deeper with each passive respondent.
We recommend using Gong or Google Meet with tl;dv activated as integration with Survicate. That way the interviews will automatically enrich your Survicate research repository with transcriptions and extracted insights.
Step 5: Once you’ve finished your qualitative research phase, you’re ready to triangulate selected insights from your interviews. Head over to your Research Hub, create a new Research Project, and select “One-Time Analysis.”
Next up, you want to add all of the relevant sources to enrich your research project:
- Surveys: Ensure you add your NPS survey, and any other applicable surveys to your research
- Integrations: If you’ll continue to feed customer feedback into your project, simply enable the relevant integrations, such as customer tickets from Intercom or CRM data from Hubspot
- Transcripts: Enable all of your interview transcriptions from Gong or tl;dv
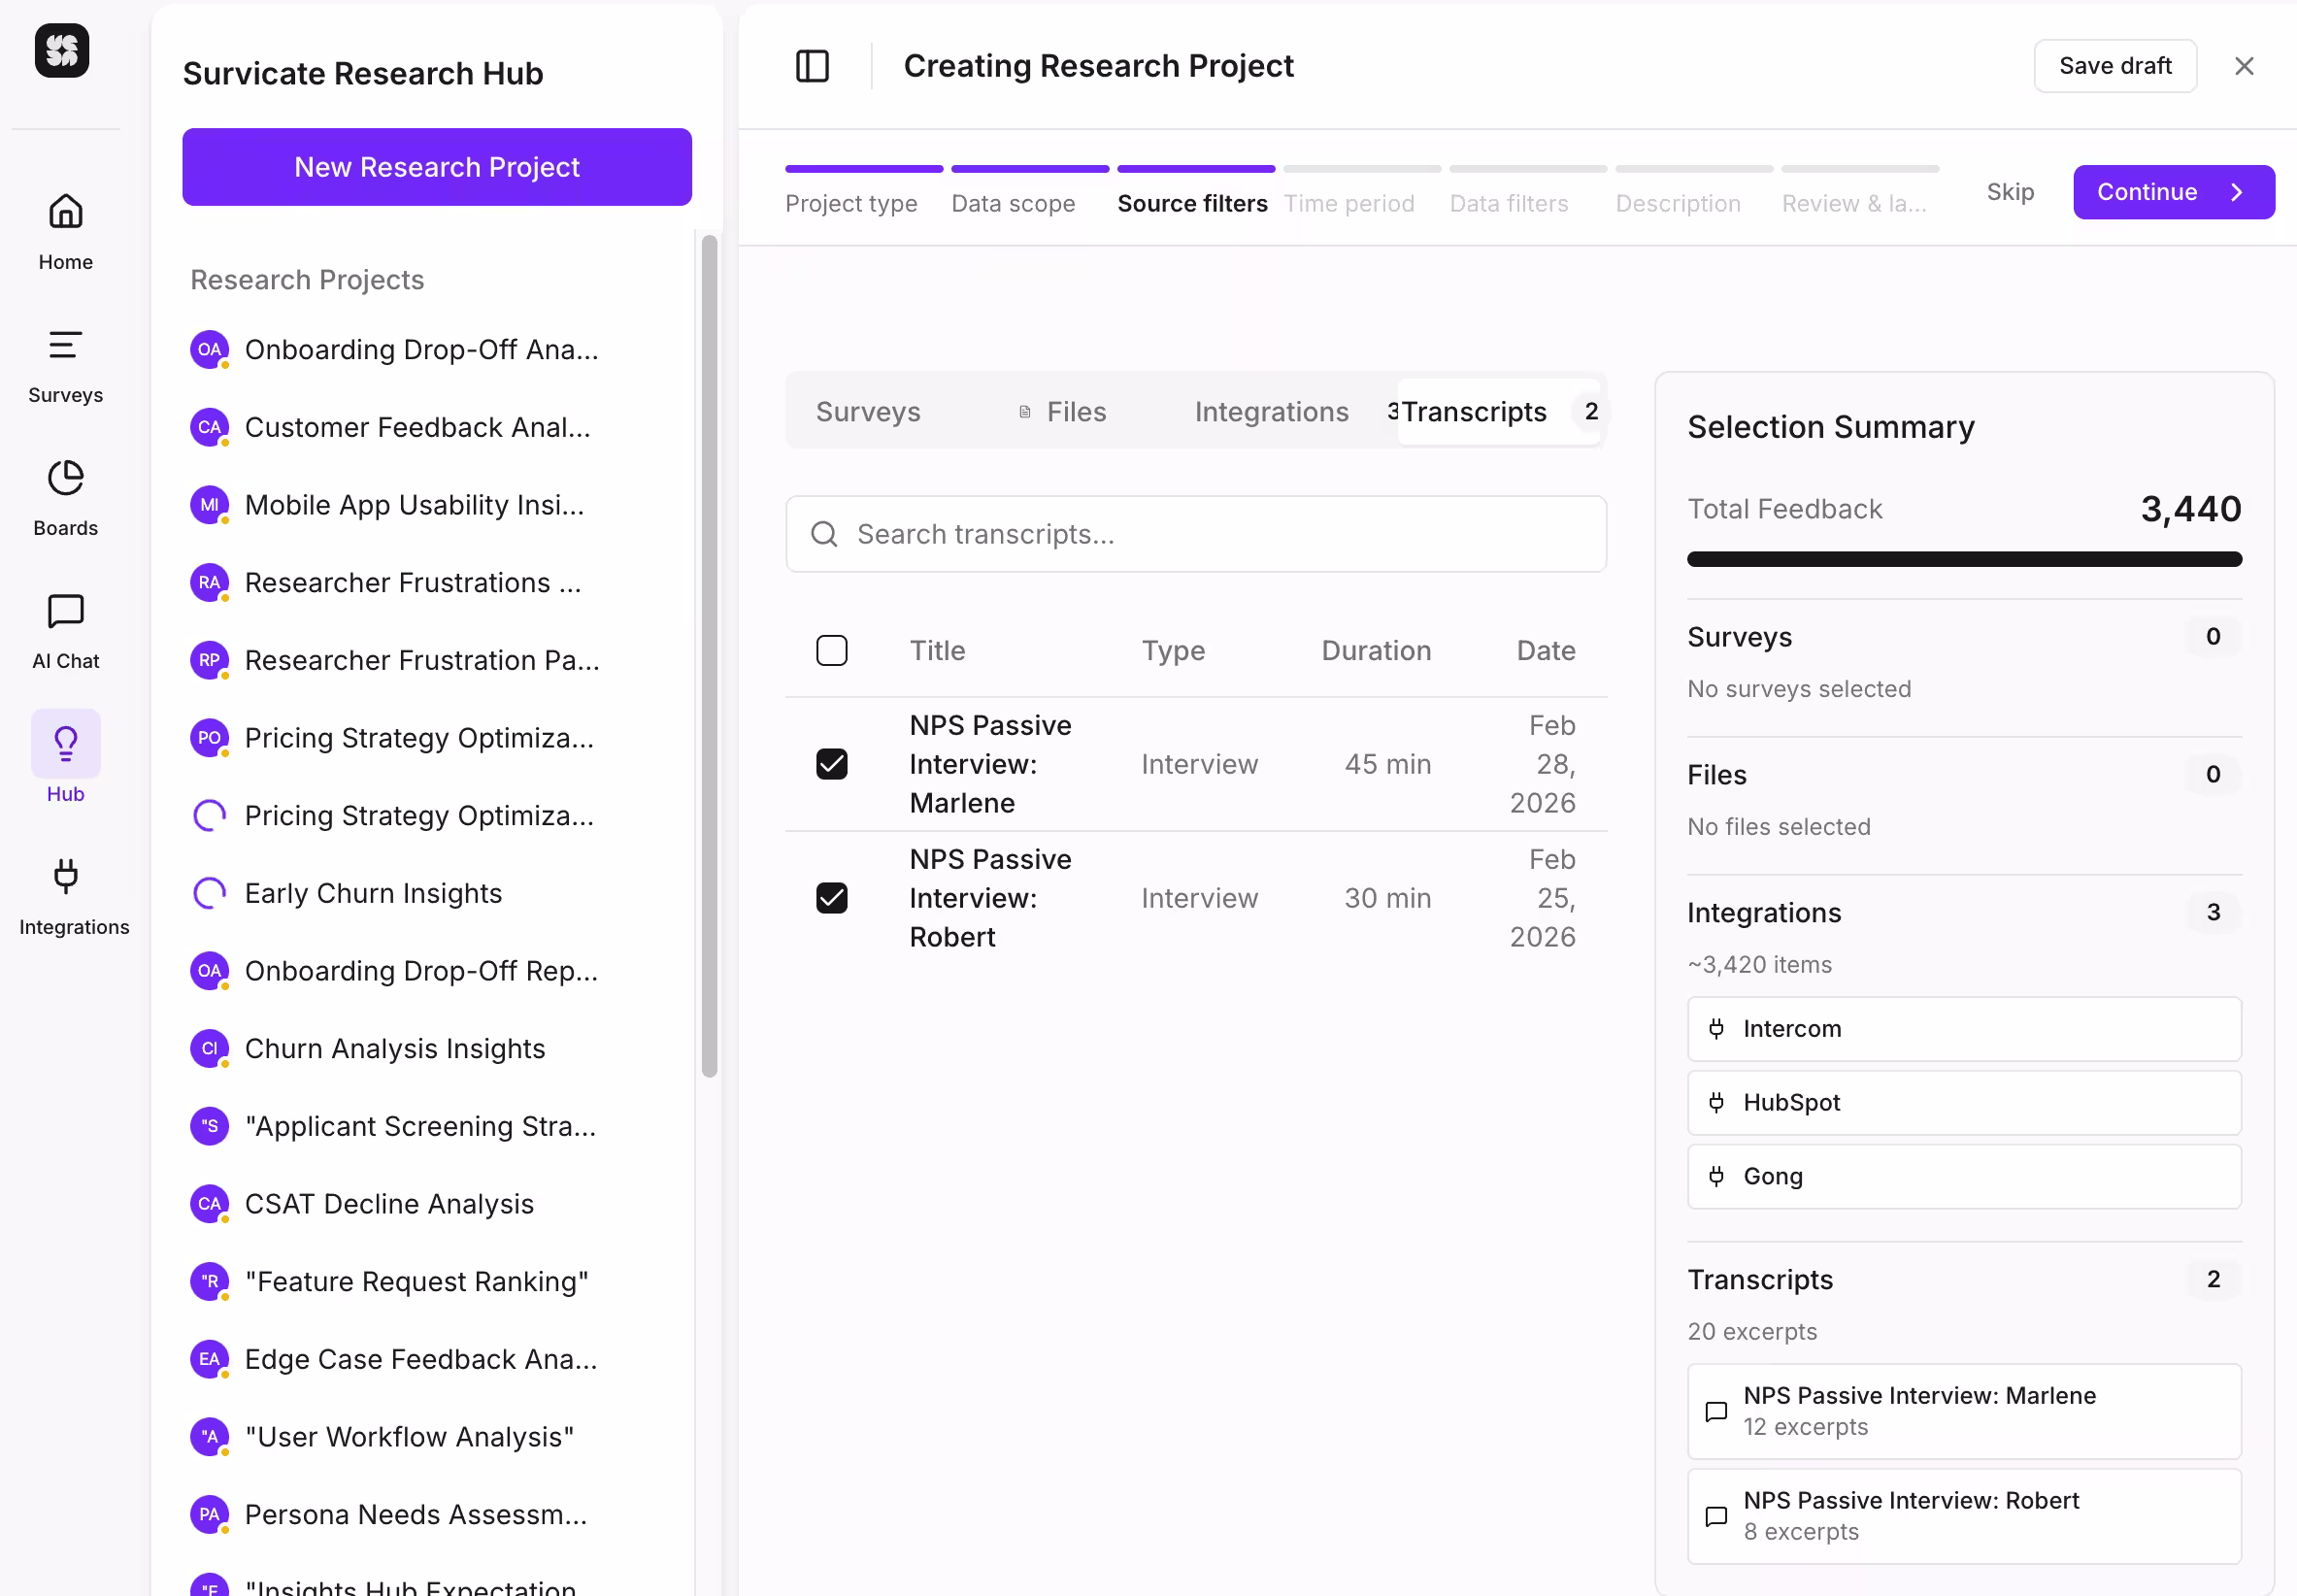
Select an appropriate time period, add any source exclusion filters to get rid of noisy data, write a project description that captures exactly what you try to do, and launch your research project.
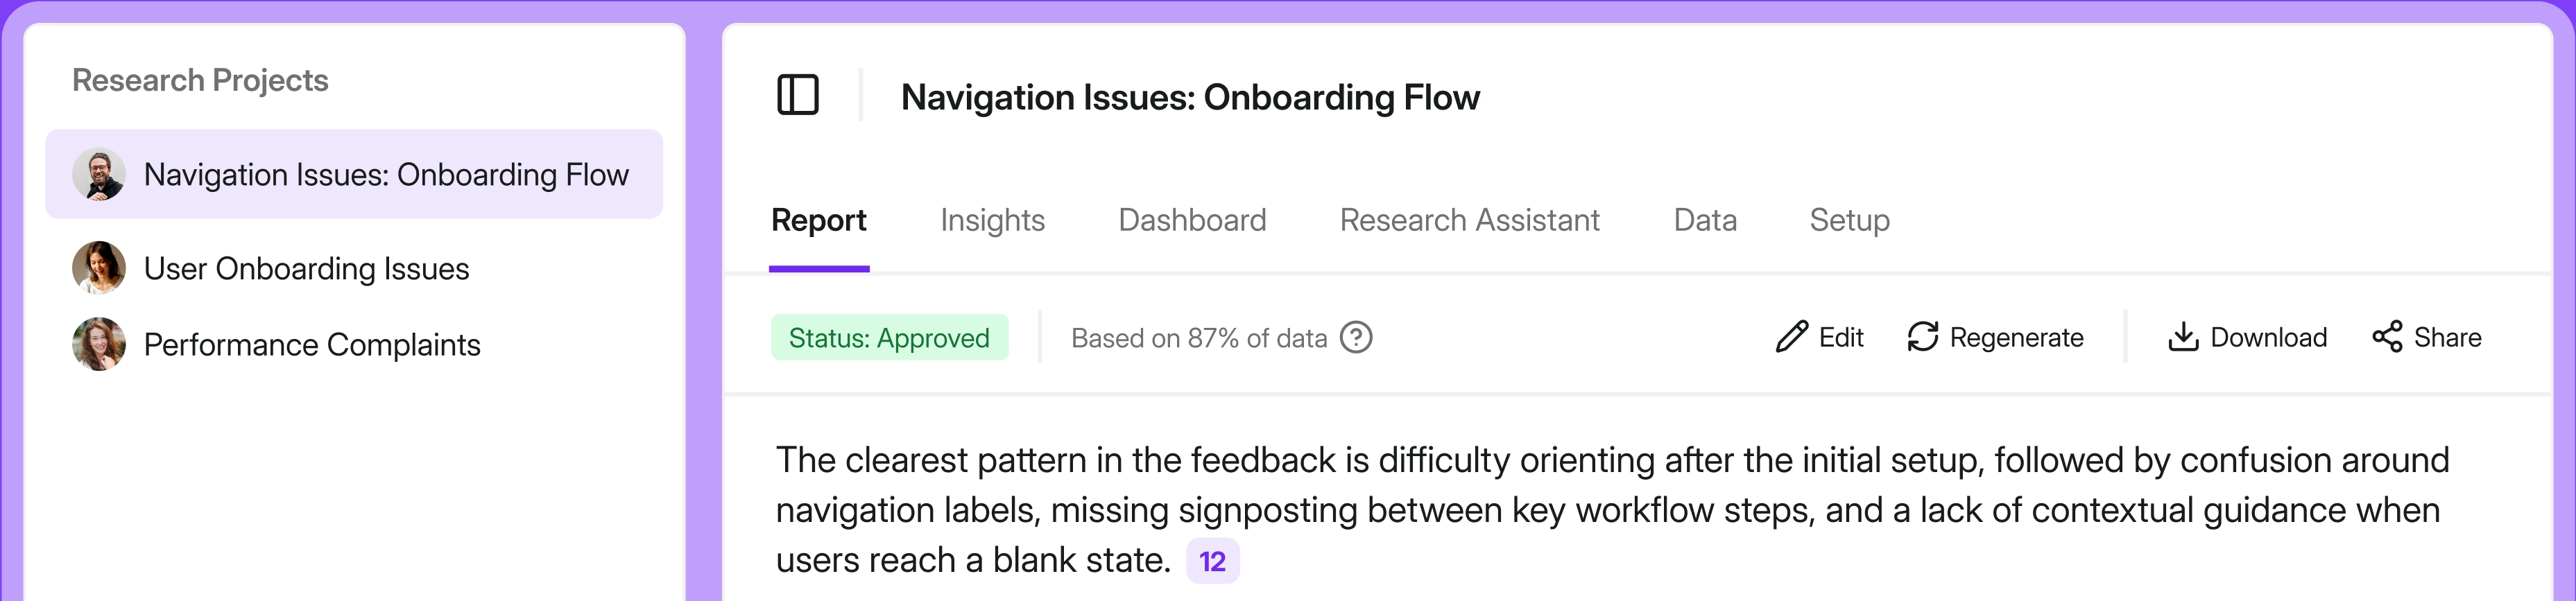
Within minutes, the report is ready for your deep-dive analysis:
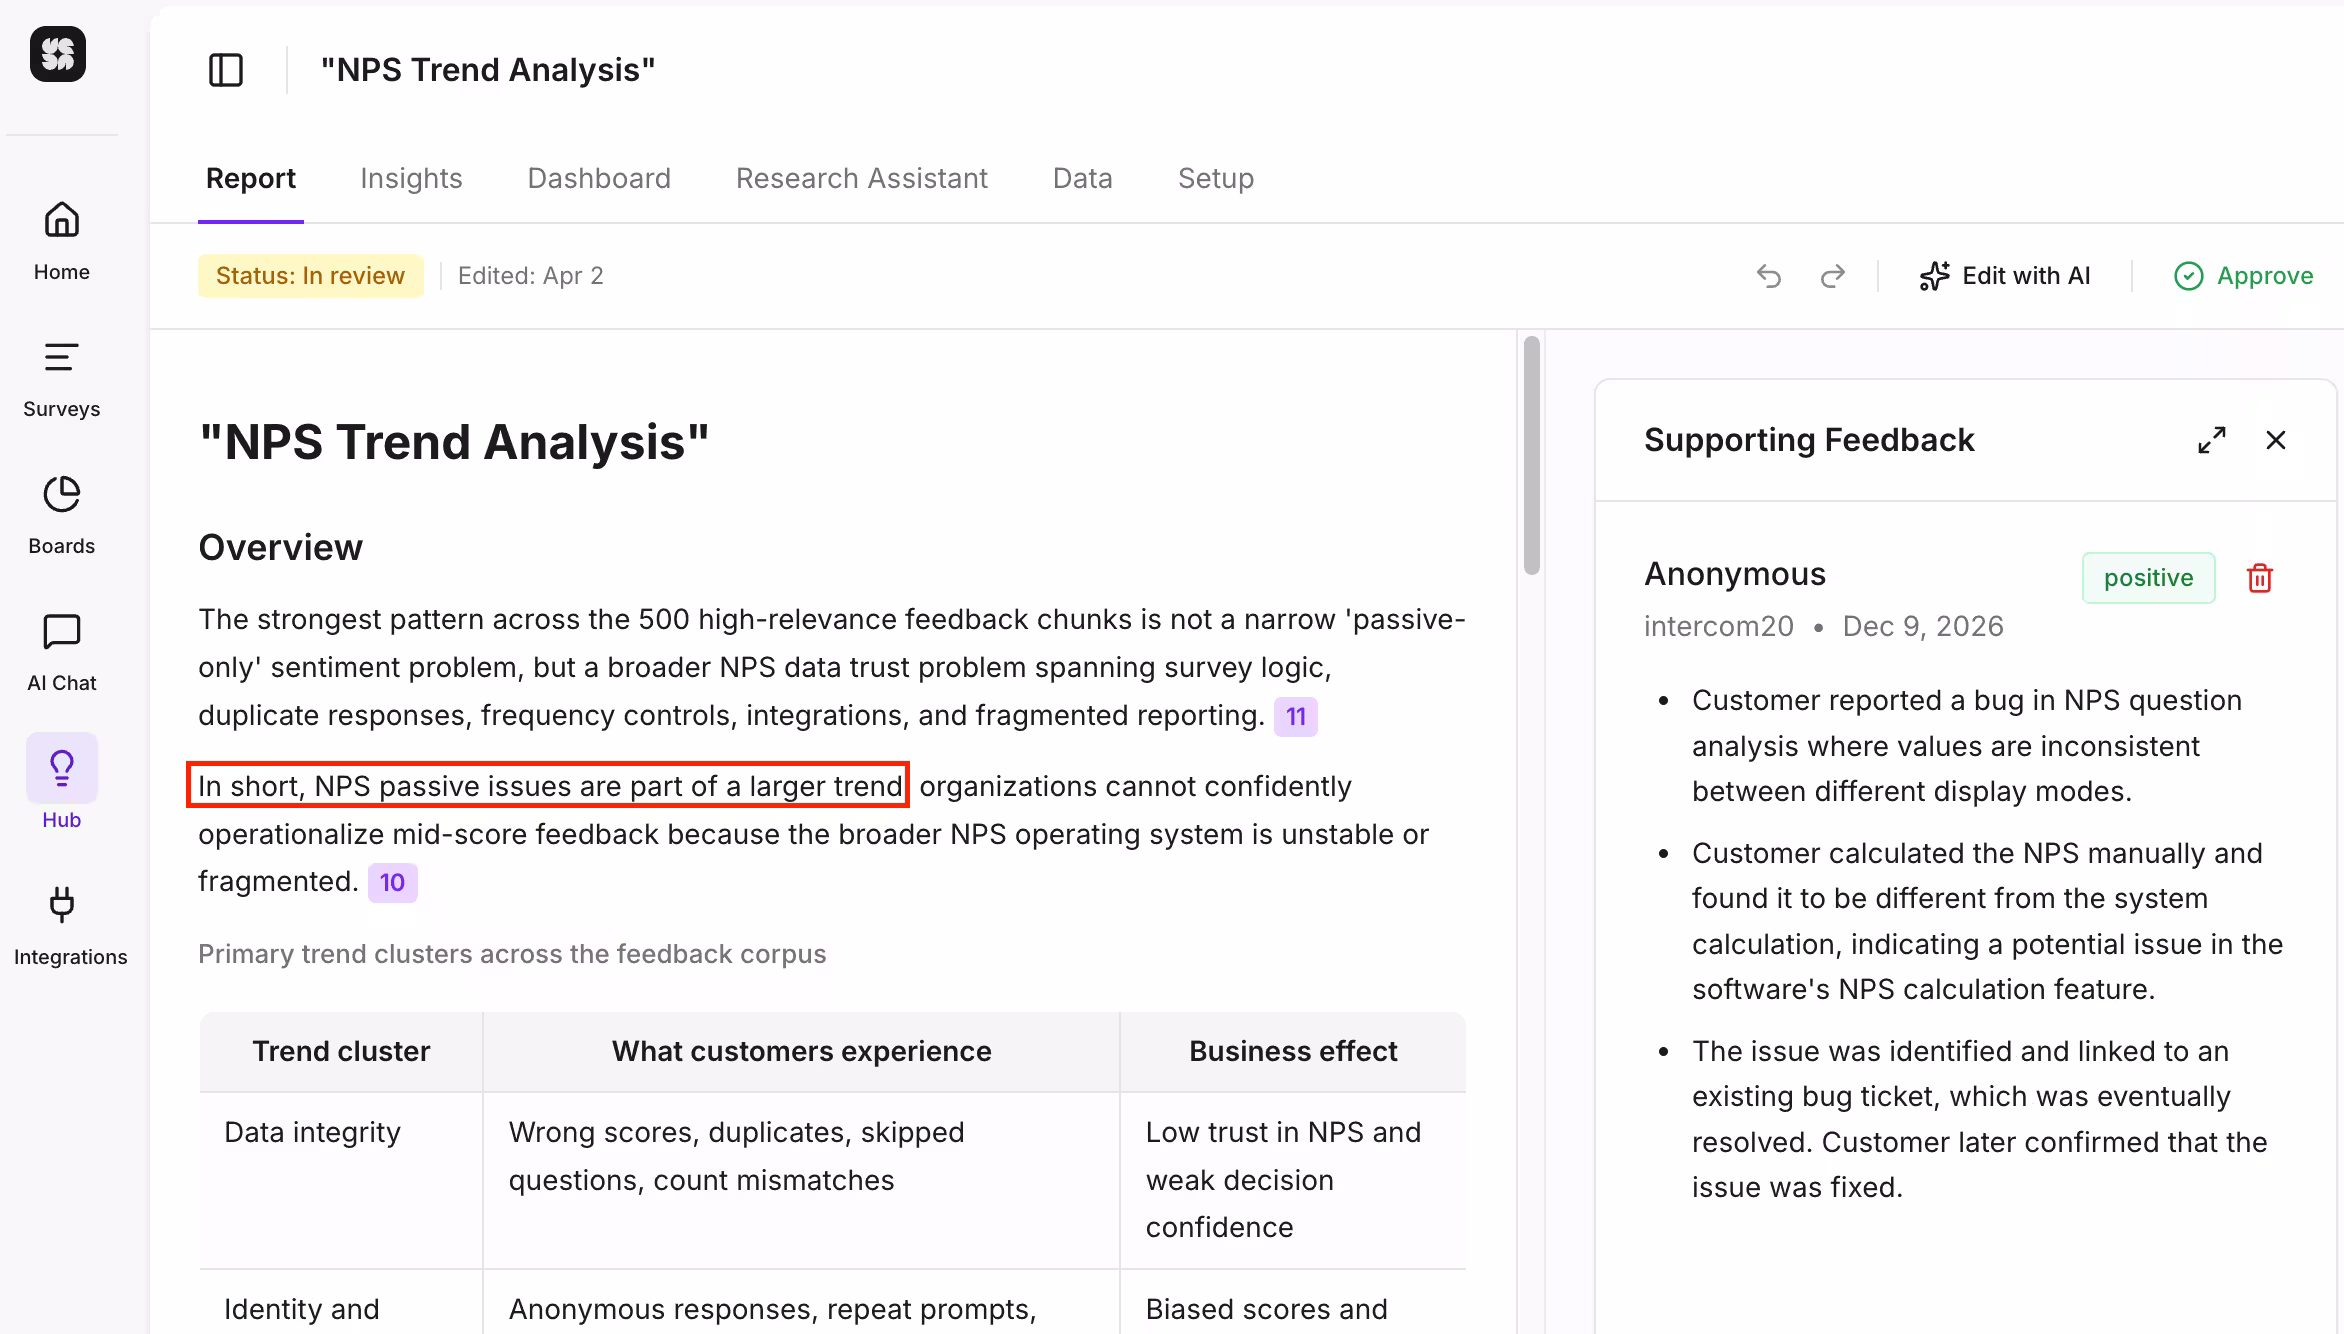
All claims are grounded in your own dataset, come with sentiment analysis, and can be traceable back to their very origin (user and source).
Wherever you wish to go deeper from the report summary, besides following the research origin, you can explore the existing, AI-generated insights or simply create your own to automatically populate them with related research data.
The Research Assistant allows you to ask one-off questions or test a hypothesis. Like always, AI acts only as your assistant, you always remain in charge.
Don’t ignore NPS Passives – reactivate them instead
It’s tempting to focus on Promoters and Detractors, because Passives don’t numerically impact your NPS score. But while they don’t, per se, affect your numbers, there’s a lot of good they can do for your business – and, probably, in a much shorter time than you’d expect.
Give these six use cases a go, and see whether you’re able to bring a smile on your Passives’ faces by listening to their feedback. Use Survicate as NPS survey tool, not only to spot this NPS group, but also to analyze what exactly they’d like to see more (or less) of in your product. Try out for Free.


.svg)

.svg)